Love this? Save it for later!
Share the inspiration with your friends
Introduction
“I wasn’t expecting dinner to turn into a mini party,” I remember telling my friend last Thursday evening, laughing about how my kitchen looked like a sauce explosion aftermath. The plan was simple: whip up some quick chicken strips for my niece and nephew who were dropping by after school. But, you know how kids can be picky—especially when it comes to sauces. They wanted variety, and honestly, I hadn’t prepared for that. Luckily, with a little improvisation (and a dash of patience), I came up with these crispy chicken strip dippers paired with three kid-approved sauces that saved the night.
It all started when I grabbed the wrong flour—gluten-free instead of all-purpose—and thought, “Well, that’s going to be a disaster.” But to my surprise, the chicken came out extra crunchy, almost like those fancy restaurant strips. The sauces? A happy accident, really—each inspired by whatever was in the fridge and pantry, but somehow they nailed the kid-friendly flavor trifecta: sweet, tangy, and creamy.
Maybe you’ve been there—facing a hungry crowd with limited time and even fewer willing taste testers. This recipe stayed with me because it’s simple, quick, and honestly, it’s become my go-to for dinner emergencies and casual get-togethers alike. Plus, the crispy chicken strip dippers with these sauces bring a little fun back to the table, and who doesn’t need that?
Why You’ll Love This Recipe
Having tested this recipe through countless kid dinners and surprise visits (not to mention a few adult-approved taste tests), I can confidently say it’s a winner in my kitchen. Here’s why it might become your favorite too:
- Quick & Easy: Ready in under 30 minutes—perfect for hectic weeknights or last-minute cravings.
- Simple Ingredients: No need for fancy specialty shops; everything’s probably sitting in your pantry or fridge.
- Perfect for Family Meals: Great for casual dinners, lunchboxes, or even weekend movie nights.
- Crowd-Pleaser: Kids and adults alike give these chicken strips rave reviews, especially with the sauces.
- Unbelievably Delicious: That crunch-to-tender ratio is just right, making every bite satisfying.
What sets this recipe apart is the crispy coating that stays crunchy without being greasy, thanks to a simple but effective batter technique using a combo of flour and cornstarch. The sauces? Each one was carefully balanced—like the honey mustard’s zesty sweetness, the creamy garlic ranch with a hint of dill, and a tangy BBQ dip that’s just smoky enough without overwhelming young palates.
This isn’t just your run-of-the-mill chicken strip recipe. It’s the kind that makes you close your eyes after the first bite and smile, knowing you nailed it. Whether you’re impressing guests or just feeding hungry kids, these crispy chicken strip dippers with three kid-approved sauces hit the spot every time.
What Ingredients You Will Need
This recipe uses straightforward, family-friendly ingredients that come together to create a crispy, flavorful chicken with sauces that kids adore. Most are pantry staples, and substitutions are simple if needed.
- For the Chicken Strips:
- 1 pound (450g) boneless, skinless chicken breasts, cut into strips
- 1 cup (120g) all-purpose flour (or gluten-free flour blend for GF option)
- ½ cup (60g) cornstarch (helps with crispiness)
- 1 teaspoon garlic powder
- 1 teaspoon smoked paprika (adds subtle smoky flavor)
- ½ teaspoon salt
- ½ teaspoon black pepper
- 2 large eggs, beaten (room temperature)
- Vegetable oil or canola oil for frying (about 2 cups)
- For the Honey Mustard Sauce:
- ¼ cup (60ml) mayonnaise
- 2 tablespoons Dijon mustard
- 1 tablespoon honey (adjust to taste)
- 1 teaspoon lemon juice
- For the Creamy Garlic Ranch Sauce:
- ½ cup (120ml) sour cream or Greek yogurt
- 1 tablespoon mayonnaise
- 1 small garlic clove, minced
- 1 teaspoon dried dill
- ½ teaspoon onion powder
- Salt and pepper to taste
- For the Tangy BBQ Sauce:
- ½ cup (120ml) ketchup
- 2 tablespoons apple cider vinegar
- 1 tablespoon brown sugar
- 1 teaspoon smoked paprika
- ½ teaspoon Worcestershire sauce
- Pinch of cayenne pepper (optional, for a slight kick)
Quick Tip: I usually pick King Arthur Flour for reliable texture, and when frying, a neutral oil like canola works best for crispness without overpowering flavor. If you’re out of cornstarch, potato starch is a good alternative. For dairy-free options, swap sour cream with coconut yogurt and mayonnaise with vegan mayo.
Equipment Needed
- Large mixing bowls (for flour mixture and eggs)
- Sharp knife and cutting board (for slicing chicken)
- Deep frying pan or heavy-bottomed skillet (about 10-inch diameter)
- Cooking thermometer (to monitor oil temperature around 350°F / 175°C)
- Slotted spoon or tongs (for flipping and removing strips)
- Wire rack with baking sheet (to drain excess oil and keep strips crispy)
- Small bowls for sauces (for serving and mixing)
If you don’t have a deep frying pan, a heavy skillet works fine but watch oil levels carefully. For a healthier twist, an air fryer can be used, but I do find the traditional pan-frying method gives that unbeatable crunch. I once tried baking these strips on parchment paper—honestly, they lacked the same crisp texture. Also, keep your thermometer handy; frying at the wrong temperature can make the strips greasy or dry.
Preparation Method
- Prep the Chicken: Cut 1 pound (450g) of boneless, skinless chicken breasts into bite-sized strips, about 3 inches long and 1 inch thick. Try to keep uniform size so they cook evenly. (Approx. 5 minutes)
- Mix the Dry Coating: In a large bowl, combine 1 cup (120g) all-purpose flour, ½ cup (60g) cornstarch, 1 teaspoon garlic powder, 1 teaspoon smoked paprika, ½ teaspoon salt, and ½ teaspoon black pepper. Whisk it well to distribute spices evenly. (Approx. 3 minutes)
- Beat the Eggs: In a separate bowl, beat 2 large eggs until smooth and slightly frothy. Room temperature eggs help the coating stick better. (Approx. 2 minutes)
- Coat the Chicken Strips: One by one, dip each chicken strip in the egg, letting excess drip off, then dredge in the flour mixture, pressing lightly to adhere. Place coated strips on a plate or tray. (Approx. 10 minutes)
- Heat the Oil: Pour about 2 cups of vegetable or canola oil into a deep frying pan or skillet. Heat to 350°F (175°C). Use a thermometer to check temperature; this prevents soggy or burnt strips. (Approx. 5 minutes)
- Fry the Chicken: Carefully add strips to the hot oil in batches—do not crowd the pan. Fry for 4-5 minutes per batch, turning halfway, until golden brown and cooked through (internal temp 165°F / 74°C). Remove with slotted spoon and drain on wire rack over a baking sheet to keep crispy. (Approx. 20 minutes total)
- Prepare the Sauces: While frying, mix each sauce in small bowls:
- Honey Mustard: Combine ¼ cup mayo, 2 tbsp Dijon mustard, 1 tbsp honey, and 1 tsp lemon juice.
- Garlic Ranch: Mix ½ cup sour cream or Greek yogurt, 1 tbsp mayo, 1 minced garlic clove, 1 tsp dried dill, ½ tsp onion powder, salt, and pepper.
- BBQ Sauce: Stir together ½ cup ketchup, 2 tbsp apple cider vinegar, 1 tbsp brown sugar, 1 tsp smoked paprika, ½ tsp Worcestershire sauce, and a pinch of cayenne pepper (optional).
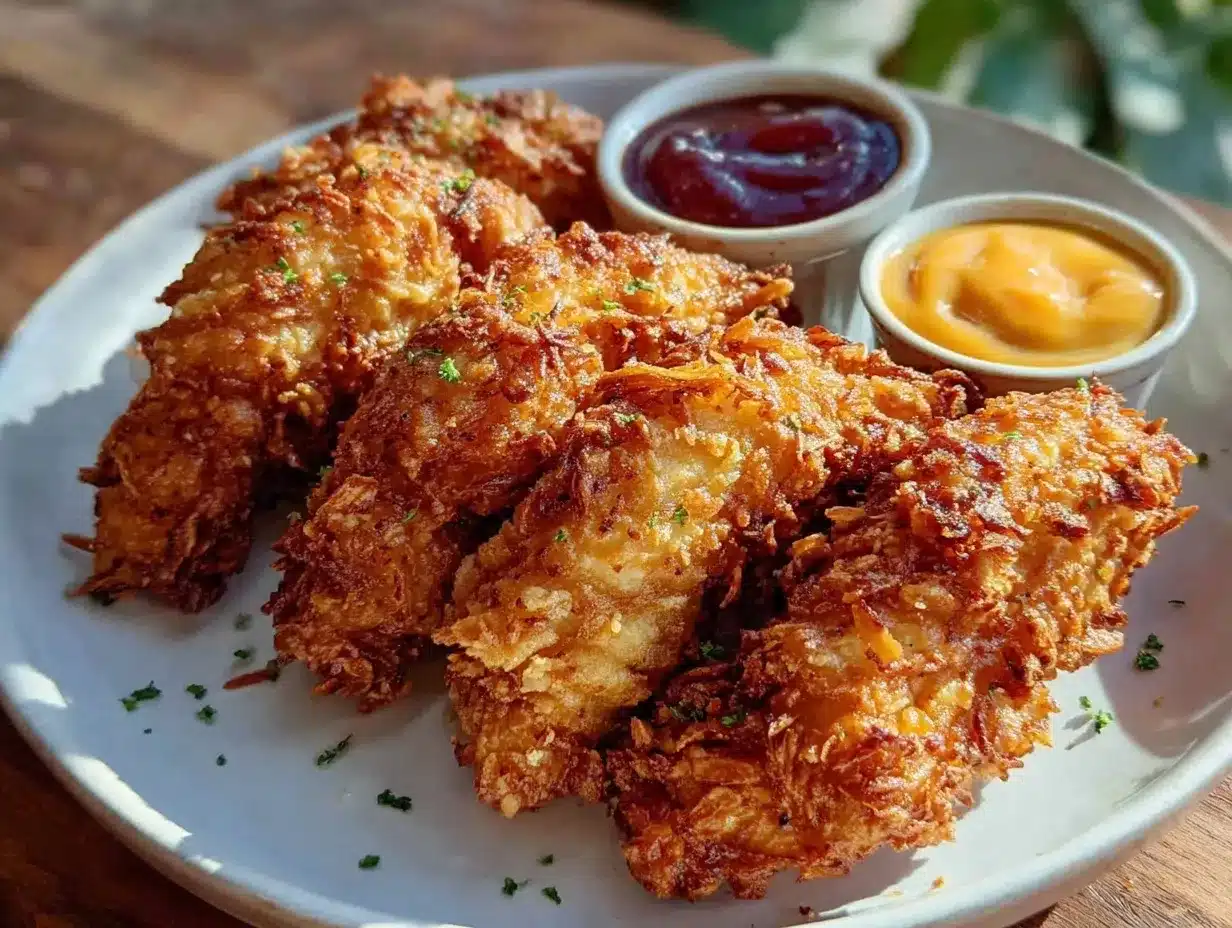
- Serve: Plate the crispy chicken strip dippers with the sauces side by side for dipping. (Approx. 2 minutes)
Pro Tip: If you notice the oil temperature dropping, pause between batches to let it recover or the chicken will absorb too much oil. If your coating falls off during frying, try pressing the flour mixture a bit more firmly before frying next batch.
Cooking Tips & Techniques
One trick I learned the hard way is the importance of cornstarch in the coating. Without it, the strips tend to be less crispy and can feel heavy. Also, patience is your friend—don’t rush the frying or overcrowd the pan, or you’ll steam the chicken instead of crisp it.
When coating the strips, make sure the chicken is dry before dipping into the egg; excess moisture can make the batter slippery and uneven. I sometimes pat the chicken with paper towels to help.
For multitasking, I start whisking sauces while the first batch fries—time saved and no one waits too long. Also, keep a wire rack handy to drain oil properly; paper towels soak but can make the strips soggy on the bottom.
Common mistake? Overfrying. Chicken cooks quickly, so keep an eye on color and feel. If strips turn too dark before fully cooked, lower the heat slightly.
Finally, let the chicken rest a minute or two after frying before serving. That’s when the magic happens—the coating crisps up even more as it cools just a bit.
Variations & Adaptations
You can easily tweak this recipe to fit your family’s tastes or dietary needs. Here are a few ideas I’ve tried or considered:
- Gluten-Free: Swap all-purpose flour with a gluten-free blend and use cornstarch or arrowroot powder to keep the crisp. I used Bob’s Red Mill 1-to-1 GF flour once and loved the results.
- Oven-Baked Version: For a lighter option, bake the coated strips at 425°F (220°C) on a greased rack for about 20 minutes, flipping halfway. Not quite as crispy but still delicious.
- Spicy Kick: Add ½ teaspoon cayenne pepper or chili powder to the flour mix and serve with a spicy sriracha mayo dipping sauce.
- Herb-Infused: Toss fresh chopped parsley or thyme into the batter or sprinkle over after frying for a fresh twist.
- Dairy-Free Sauce: Use vegan mayo and coconut yogurt in the sauces. The honey mustard is especially easy to adapt by swapping honey with maple syrup.
Personally, I once added a sprinkle of parmesan to the coating for a cheesy crunch that went over well at a casual family gathering. Feel free to experiment until you find your perfect combo!
Serving & Storage Suggestions
Serve these crispy chicken strip dippers warm for the best crunch—straight from the pan or after a brief rest. They pair wonderfully with simple sides like carrot sticks, celery, or a fresh green salad. For drinks, a cold glass of lemonade or iced tea complements the flavors nicely.
Leftovers can be stored in an airtight container in the fridge for up to 3 days. To reheat, pop them in a 375°F (190°C) oven or toaster oven for 5-7 minutes to bring back the crispiness. Avoid microwaving if you want to keep the crunch—it tends to make the coating soggy.
Flavors in the sauces may deepen overnight, especially the BBQ sauce, making them even better the next day. So, making sauces a day ahead can save time on busy nights.
Nutritional Information & Benefits
Each serving (about 4 strips with sauces) contains approximately 350-400 calories depending on the oil absorption and sauce portions. The chicken provides a good source of lean protein, essential for growing kids and active adults.
The garlic and herbs in the ranch sauce offer some antioxidants, while the honey mustard’s honey adds natural sweetness and antimicrobial properties. The BBQ sauce has a bit of sugar, so use sparingly if watching sugar intake.
This recipe can be adapted to low-carb by using almond flour in place of regular flour and skipping the honey mustard for a less sweet sauce. Always consider any allergies, especially egg or dairy, and swap ingredients accordingly.
From a wellness standpoint, homemade chicken strips like this avoid the additives and preservatives found in many store-bought options, making it a cleaner, more wholesome choice for family meals.
Conclusion
If you’re looking for a fun, easy, and reliably delicious chicken dinner, these crispy chicken strip dippers with three kid-approved sauces are a must-try. They bring a little excitement back to family meals without fuss or fancy ingredients.
Feel free to customize the sauces or tweak the coating to suit your tastes—cooking is all about making recipes your own, after all. I love this recipe because it reminds me how a simple meal can turn into a joyful moment, especially when shared with loved ones (and maybe a little sauce mess on the counter).
Please leave a comment below if you try the recipe or have your own sauce ideas! Sharing is what keeps these family favorites alive and kicking.
Happy cooking and dipping!
FAQs
Can I bake the chicken strips instead of frying?
Yes, you can bake them at 425°F (220°C) for about 20 minutes on a greased rack, flipping halfway. They won’t be as crispy as fried but still tasty and healthier.
How do I keep the chicken strips crispy after frying?
Drain them on a wire rack instead of paper towels to avoid sogginess. Also, serve shortly after frying or reheat in the oven for best texture.
What if I don’t have cornstarch?
Potato starch is a good substitute for crispiness. If neither is available, extra flour works but the crunch might be less pronounced.
Can I prepare the sauces ahead of time?
Absolutely! Sauces can be made a day in advance and kept refrigerated. Flavors often develop and improve overnight.
Are these sauces suitable for picky eaters?
Yes, the sauces are mild, flavorful, and kid-tested. You can adjust sweetness or tanginess easily to suit preferences.
For a similar crispy chicken experience, you might enjoy the crispy garlic chicken recipe I shared recently, which also pairs well with homemade sauces.
Pin This Recipe!

Crispy Chicken Strip Dippers Recipe with 3 Easy Kid-Approved Sauces

A quick and easy recipe for crispy chicken strips paired with three kid-friendly sauces: honey mustard, creamy garlic ranch, and tangy BBQ. Perfect for family meals and casual get-togethers.
- Prep Time: 20 minutes
- Cook Time: 20 minutes
- Total Time: 40 minutes
- Yield: 4 servings 1x
- Category: Main Course
- Cuisine: American
Ingredients
- 1 pound (450g) boneless, skinless chicken breasts, cut into strips
- 1 cup (120g) all-purpose flour (or gluten-free flour blend for GF option)
- ½ cup (60g) cornstarch
- 1 teaspoon garlic powder
- 1 teaspoon smoked paprika
- ½ teaspoon salt
- ½ teaspoon black pepper
- 2 large eggs, beaten (room temperature)
- Vegetable oil or canola oil for frying (about 2 cups)
- ¼ cup (60ml) mayonnaise (for honey mustard sauce)
- 2 tablespoons Dijon mustard (for honey mustard sauce)
- 1 tablespoon honey (for honey mustard sauce)
- 1 teaspoon lemon juice (for honey mustard sauce)
- ½ cup (120ml) sour cream or Greek yogurt (for garlic ranch sauce)
- 1 tablespoon mayonnaise (for garlic ranch sauce)
- 1 small garlic clove, minced (for garlic ranch sauce)
- 1 teaspoon dried dill (for garlic ranch sauce)
- ½ teaspoon onion powder (for garlic ranch sauce)
- Salt and pepper to taste (for garlic ranch sauce)
- ½ cup (120ml) ketchup (for BBQ sauce)
- 2 tablespoons apple cider vinegar (for BBQ sauce)
- 1 tablespoon brown sugar (for BBQ sauce)
- 1 teaspoon smoked paprika (for BBQ sauce)
- ½ teaspoon Worcestershire sauce (for BBQ sauce)
- Pinch of cayenne pepper (optional, for BBQ sauce)
Instructions
- Cut 1 pound (450g) boneless, skinless chicken breasts into bite-sized strips, about 3 inches long and 1 inch thick.
- In a large bowl, combine 1 cup (120g) all-purpose flour, ½ cup (60g) cornstarch, 1 teaspoon garlic powder, 1 teaspoon smoked paprika, ½ teaspoon salt, and ½ teaspoon black pepper. Whisk well.
- In a separate bowl, beat 2 large eggs until smooth and slightly frothy.
- Dip each chicken strip in the beaten eggs, letting excess drip off, then dredge in the flour mixture, pressing lightly to adhere. Place coated strips on a plate or tray.
- Pour about 2 cups of vegetable or canola oil into a deep frying pan or skillet. Heat to 350°F (175°C). Use a thermometer to check temperature.
- Fry chicken strips in batches without crowding the pan for 4-5 minutes per batch, turning halfway, until golden brown and cooked through (internal temp 165°F / 74°C). Remove with slotted spoon and drain on wire rack over a baking sheet.
- While frying, prepare the sauces in small bowls: Mix ¼ cup mayo, 2 tbsp Dijon mustard, 1 tbsp honey, and 1 tsp lemon juice for honey mustard; Mix ½ cup sour cream or Greek yogurt, 1 tbsp mayo, 1 minced garlic clove, 1 tsp dried dill, ½ tsp onion powder, salt, and pepper for garlic ranch; Stir ½ cup ketchup, 2 tbsp apple cider vinegar, 1 tbsp brown sugar, 1 tsp smoked paprika, ½ tsp Worcestershire sauce, and a pinch of cayenne pepper for BBQ sauce.
- Serve the crispy chicken strip dippers warm with the three sauces side by side for dipping.
Notes
Use a cooking thermometer to maintain oil temperature at 350°F to avoid greasy or dry strips. Drain fried strips on a wire rack instead of paper towels to keep them crispy. For gluten-free, use a gluten-free flour blend and cornstarch or arrowroot powder. For dairy-free sauces, substitute sour cream with coconut yogurt and mayonnaise with vegan mayo. Baking option: bake at 425°F for 20 minutes on a greased rack, flipping halfway, for a less crispy but healthier version.
Nutrition
- Serving Size: About 4 chicken stri
- Calories: 375
- Sugar: 6
- Sodium: 550
- Fat: 22
- Saturated Fat: 3.5
- Carbohydrates: 25
- Fiber: 1
- Protein: 28
Keywords: crispy chicken strips, chicken dippers, kid-friendly sauces, honey mustard sauce, garlic ranch sauce, BBQ sauce, quick chicken recipe, family dinner