Love this? Save it for later!
Share the inspiration with your friends
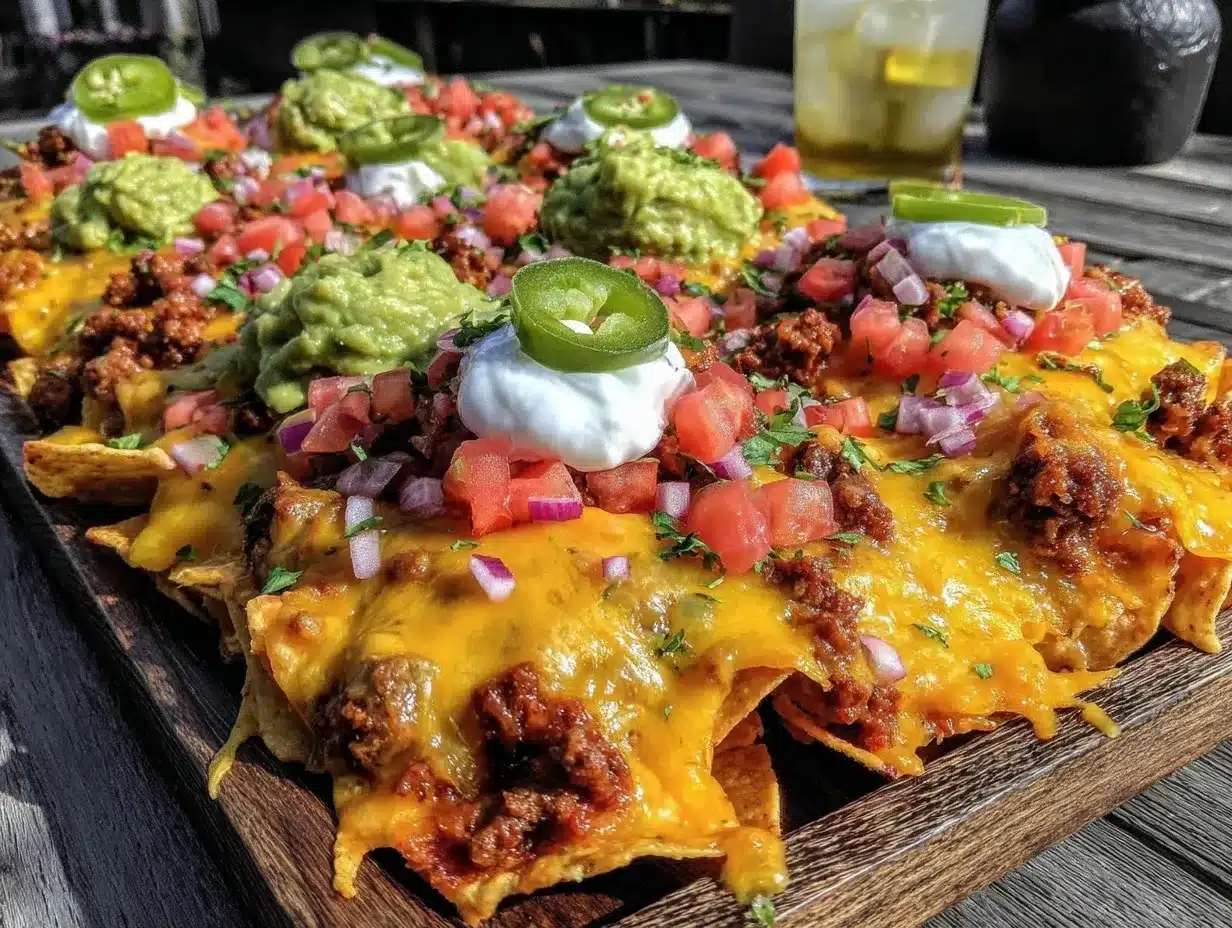
Last Saturday, my buddy Jake watched me fumble around with a sad little pile of chips and some shredded cheese, clearly struggling to get the perfect game day snack ready. He didn’t say much at first, just chuckled and went back to setting up his cooler. Then, out of nowhere, he slid over a big sheet pan packed with this insane, savory loaded nacho tailgate bar that looked like the ultimate game day dream. Honestly, I hadn’t realized how much of a difference layering flavors and textures could make until I took that first bite—crispy chips, gooey cheese, spicy jalapeños, and all the fixings piled high. You know that feeling when a simple snack turns into a full-on celebration? That’s exactly what happened.
The magic here wasn’t just the recipe itself but the way Jake casually shared it while we were setting up for kickoff with a crowd of friends at the local park. It wasn’t some fancy cooking lesson, just a natural exchange between folks who love good food and good company. I made a mess trying to replicate it that night (forgot the sour cream, of all things), but the crowd didn’t seem to mind—the flavors spoke for themselves. This savory loaded nacho tailgate bar stuck with me because it’s the kind of recipe that brings everyone together, no fuss, just pure, satisfying fun. Maybe you’ve been there, too—trying to find that perfect dish that’s both crowd-pleaser and easy on the host. Let me tell you, this one’s a winner every time.
Why You’ll Love This Recipe
After testing and tweaking this savory loaded nacho tailgate bar recipe through countless gatherings, I can confidently say it’s a game changer for your next party. Whether you’re a seasoned host or just want to impress without stress, this recipe checks all the boxes.
- Quick & Easy: Ready in under 30 minutes, perfect for last-minute game day setups or spontaneous hangouts.
- Simple Ingredients: Uses pantry staples and fresh toppings you likely already have—no surprise store runs needed.
- Perfect for Game Day Parties: Tailored for sharing and snacking, making it the star of your tailgate or living room spread.
- Crowd-Pleaser: From kids to adults, everyone loves the melt of cheese with crispy chips and zesty toppings.
- Unbelievably Delicious: The combo of smoky, spicy, and creamy flavors delivers that next-level comfort food vibe.
What sets this apart? The layering technique and the balance of textures—each bite bursts with flavor and crunch. Instead of just dumping toppings on chips, this recipe builds a loaded bar where every ingredient shines without overwhelming the others. Plus, I swapped in a smoky chipotle cheese blend that brings a subtle heat without overpowering the palate. Honestly, it’s the kind of recipe that makes you close your eyes after the first bite and say, “Yep, this is it.” If you’ve ever struggled to find the perfect snack that’s both satisfying and fuss-free, this savory loaded nacho tailgate bar is your new go-to.
What Ingredients You Will Need
This savory loaded nacho tailgate bar relies on simple, wholesome ingredients to deliver bold flavor and satisfying textures without complicated prep. Most ingredients are pantry staples, with fresh toppings that bring brightness and crunch.
- Tortilla Chips: Choose sturdy, thick-cut chips like Mission Tortilla Chips for best crunch and hold.
- Cheese Blend: 2 cups shredded sharp cheddar cheese and 1 cup shredded Monterey Jack cheese (adds creamy melt and tang).
- Ground Beef: 1 lb (450 g) lean ground beef, browned and seasoned (adds savory protein punch).
- Black Beans: 1 can (15 oz / 425 g), drained and rinsed (for fiber and texture).
- Jalapeños: 2 fresh, sliced thin (adjust heat to taste).
- Green Onions: 3 stalks, chopped (offers fresh bite).
- Tomatoes: 2 medium, diced (adds juicy, fresh contrast).
- Olives: ½ cup sliced black olives (optional, for briny notes).
- Sour Cream: ½ cup (for creamy topping).
- Guacamole: 1 cup, freshly made or store-bought (adds rich creaminess).
- Seasonings: 1 tsp chili powder, ½ tsp cumin, ½ tsp smoked paprika, salt and pepper to taste.
- Fresh Cilantro: A handful, roughly chopped (for garnish and bright herbal touch).
For substitutions, swap ground beef for ground turkey or even a plant-based crumble to suit dietary preferences. Use dairy-free cheese and sour cream if needed, and you can always swap fresh jalapeños for pickled ones to add a tangy kick. In summer, fresh pico de gallo works beautifully instead of diced tomatoes. Trust me, these little tweaks keep the recipe flexible and family-friendly.
Equipment Needed
- Large Baking Sheet or Sheet Pan: To layer and bake the nachos evenly. I prefer a rimmed sheet pan to catch any drips and make cleanup easier.
- Nonstick Skillet: For browning the ground beef and sautéing spices. A heavy-bottomed skillet works best to prevent sticking.
- Mixing Bowls: Various sizes to prep toppings and combine ingredients.
- Sharp Knife and Cutting Board: For chopping fresh toppings like tomatoes, jalapeños, and green onions.
- Spatula or Wooden Spoon: For stirring the beef mixture.
If you don’t have a baking sheet, a cast iron skillet can work great for stovetop nachos and keeps heat evenly distributed. For budget-friendly options, I’ve used disposable aluminum pans when tailgating outdoors, which saves washing up and still gives excellent results. Just be sure to avoid overcrowding the chips to keep them crispy. Keeping your skillet and pan clean and dry before starting is a trick I learned to avoid soggy nachos mid-bake.
Preparation Method
- Preheat your oven to 400°F (200°C). This temperature crisps the chips and melts cheese perfectly without drying out the toppings. (5 minutes prep)
- Brown the ground beef: Heat your skillet over medium heat, add 1 lb (450 g) ground beef. Break it up with a spatula and cook until no longer pink, about 7-8 minutes. Drain excess fat if needed.
- Season the beef: Add 1 tsp chili powder, ½ tsp cumin, ½ tsp smoked paprika, salt, and pepper. Stir well and cook for another 2 minutes so the spices bloom and coat the meat evenly.
- Prepare toppings while beef cooks: Chop 2 medium tomatoes, slice 2 jalapeños thin, chop 3 green onions, and rinse 1 can (15 oz / 425 g) black beans. Set aside.
- Layer the nachos: On your baking sheet, spread a single layer of sturdy tortilla chips (about 8 cups). Evenly sprinkle half the shredded sharp cheddar and Monterey Jack cheeses over the chips.
- Add half the beef and black beans: Distribute evenly over the cheese layer. Then add half the jalapeños, tomatoes, olives (if using), and green onions.
- Repeat layering: Add another layer of chips, remaining cheese, beef, beans, and toppings. This double-layer technique builds flavor and helps chips stay crispy on the bottom.
- Bake the nachos: Place the sheet pan in the oven and bake for 10-12 minutes until cheese is fully melted and bubbly. Keep an eye so chips don’t burn.
- Remove and garnish: Once out of the oven, dollop ½ cup sour cream and 1 cup guacamole evenly over the top. Sprinkle chopped fresh cilantro for a bright finish.
- Serve immediately: Bring the whole pan to your friends and watch them dig in—trust me, they won’t wait around.
Pro tip: If you want to prep ahead, cook and season the beef the day before and store it in an airtight container. When ready to serve, just assemble and bake. Also, layering cheese between chip layers keeps everything gooey and melty rather than clumpy. If your oven tends to run hot, reduce bake time slightly and check early to avoid crispy chip casualties.
Cooking Tips & Techniques
One key to perfect nachos is balance—too many toppings can weigh down chips, making them soggy, while too few leaves them dry. I learned this the hard way the first time I piled everything on top and ended up with a soggy mess. Layering chips and cheese in stages is a game changer.
Use a mix of cheeses for flavor depth and meltability. Sharp cheddar brings tang, Monterey Jack melts beautifully, and a little smoked cheese adds complexity if you want to experiment. Also, cooking the beef with spices before adding it to the nachos ensures every bite is flavorful, not just salty.
Don’t forget to drain your beans well—any extra liquid can turn those crispy chips into a sad snack. And if you like heat, fresh jalapeños are best, but for milder crowds, pickled jalapeños offer tang without overwhelming spice.
Timing is everything. Assemble your nachos just before baking so the chips don’t soak in moisture. While the oven preheats, prep toppings and brown the beef to streamline the process. This multitasking helps get your savory loaded nacho tailgate bar out hot and fresh, impressing everyone.
Variations & Adaptations
This recipe is super flexible, so feel free to make it your own:
- Vegetarian Version: Swap the ground beef for 1 lb (450 g) plant-based crumbles or roasted veggies like bell peppers and mushrooms. Extra beans add protein and texture.
- Spicy Kick: Add diced fresh serrano peppers or a drizzle of hot sauce on top right before serving for those who like it fiery.
- Seasonal Twist: In fall, mix in roasted butternut squash cubes or swap tomatoes for roasted corn kernels for a sweet contrast.
- Cheese-Free: Use a dairy-free cheese alternative and swap sour cream for coconut yogurt to keep it creamy and allergy-friendly.
- Cooking Method: For tailgate grills, assemble nachos in a cast iron skillet and cover with foil. Cook over medium heat for 8-10 minutes until cheese melts.
Once, I tried swapping tortilla chips for pita chips at a friend’s house—it was surprisingly good and held up well with the toppings, especially for a less traditional twist. Honestly, this recipe invites creativity and adapts easily to whatever you have on hand or dietary needs you’re handling.
Serving & Storage Suggestions
Serve your savory loaded nacho tailgate bar hot and fresh for the best crunch and melty cheese experience. It pairs wonderfully with cold beers, margaritas, or even a tangy iced tea for the non-alcoholic crowd.
If you have leftovers (rare, but it happens), store them in an airtight container in the refrigerator for up to 2 days. To reheat, spread nachos on a baking sheet and warm in a 350°F (175°C) oven for 8-10 minutes to crisp chips back up. Avoid microwaving, or you’ll get a soggy mess.
Flavors actually deepen a bit after resting, especially if you add fresh guacamole and sour cream just before serving again. For outdoor tailgates, keep toppings like guacamole and sour cream chilled separately and add at serving time to avoid spoilage.
Nutritional Information & Benefits
Per serving (approximate, serves 6):
| Calories | 420 |
|---|---|
| Protein | 22 g |
| Fat | 23 g |
| Carbohydrates | 30 g |
| Fiber | 7 g |
| Sodium | 680 mg |
The black beans provide fiber and plant-based protein, which help keep you full longer. Ground beef offers iron and essential B vitamins. Fresh veggies like tomatoes, jalapeños, and cilantro add antioxidants and vitamins. Using moderate amounts of cheese balances flavor and calcium intake. If you need a gluten-free option, most tortilla chips are naturally gluten-free—just check the label.
From my own experience, this recipe strikes a nice balance between indulgence and nutrition, perfect for a fun game day without feeling weighed down afterward.
Conclusion
This savory loaded nacho tailgate bar recipe is worth every minute you spend prepping. It brings together bold flavors, textures, and simple ingredients in a way that feels truly special but never complicated. I love that it’s easy to customize whether you want to keep it classic or try something new, and it always manages to bring people together around good food and laughter.
So next time you’re planning a game day party or just craving a snack that’s anything but basic, give this recipe a shot. I’d love to hear how you put your own spin on it—drop a comment or share your favorite topping combos! Remember, it’s all about sharing great moments and even better bites. Here’s to many more delicious game days ahead!
FAQs
Can I make this savory loaded nacho tailgate bar ahead of time?
You can prep the beef and chop toppings a day ahead, but I recommend assembling and baking the nachos just before serving to keep chips crispy.
What’s the best way to keep the chips from getting soggy?
Layer chips with cheese between toppings and avoid piling wet ingredients directly on chips. Bake immediately after assembling.
Can I use shredded rotisserie chicken instead of ground beef?
Absolutely! Rotisserie chicken works great and can save time while adding a different flavor profile.
How spicy are these nachos? Can I adjust the heat?
The recipe is moderately spicy thanks to jalapeños and chili powder. You can reduce or omit jalapeños or swap for milder peppers to suit your taste.
What’s a good side dish to serve with this nacho bar?
A fresh green salad or corn on the cob complements the richness well. For drinks, try a cold beer or a citrusy cocktail to balance flavors.
PrintSavory Loaded Nacho Tailgate Bar Recipe for the Ultimate Game Day Party
A crowd-pleasing, layered nacho recipe perfect for game day parties, combining crispy chips, gooey cheese, spicy jalapeños, and savory ground beef with fresh toppings.
- Prep Time: 10 minutes
- Cook Time: 20 minutes
- Total Time: 30 minutes
- Yield: 6 servings 1x
- Category: Appetizer
- Cuisine: American
Ingredients
- 8 cups sturdy, thick-cut tortilla chips
- 2 cups shredded sharp cheddar cheese
- 1 cup shredded Monterey Jack cheese
- 1 lb (450 g) lean ground beef
- 1 can (15 oz / 425 g) black beans, drained and rinsed
- 2 fresh jalapeños, sliced thin
- 3 stalks green onions, chopped
- 2 medium tomatoes, diced
- ½ cup sliced black olives (optional)
- ½ cup sour cream
- 1 cup guacamole
- 1 tsp chili powder
- ½ tsp cumin
- ½ tsp smoked paprika
- Salt and pepper to taste
- A handful fresh cilantro, roughly chopped
Instructions
- Preheat your oven to 400°F (200°C).
- Heat a nonstick skillet over medium heat, add ground beef, break it up with a spatula and cook until no longer pink, about 7-8 minutes. Drain excess fat if needed.
- Add chili powder, cumin, smoked paprika, salt, and pepper to the beef. Stir well and cook for another 2 minutes.
- While beef cooks, chop tomatoes, slice jalapeños, chop green onions, and rinse black beans. Set aside.
- On a large baking sheet, spread a single layer of tortilla chips (about 8 cups). Evenly sprinkle half the shredded cheddar and Monterey Jack cheeses over the chips.
- Add half the beef and black beans evenly over the cheese layer. Then add half the jalapeños, tomatoes, olives (if using), and green onions.
- Repeat layering with another layer of chips, remaining cheese, beef, beans, and toppings.
- Bake the nachos in the oven for 10-12 minutes until cheese is fully melted and bubbly. Watch carefully to avoid burning the chips.
- Remove from oven and dollop sour cream and guacamole evenly over the top. Sprinkle chopped fresh cilantro for garnish.
- Serve immediately.
Notes
To keep chips crispy, layer cheese between chip layers and bake immediately after assembling. Drain beans well to avoid soggy chips. You can prep and season beef a day ahead. For stovetop cooking, use a cast iron skillet and cook over medium heat for 8-10 minutes covered with foil. Leftovers can be reheated in a 350°F oven for 8-10 minutes to crisp chips again. Avoid microwaving to prevent sogginess.
Nutrition
- Serving Size: Approx. 1/6 of the r
- Calories: 420
- Sodium: 680
- Fat: 23
- Carbohydrates: 30
- Fiber: 7
- Protein: 22
Keywords: nachos, loaded nachos, game day snacks, tailgate recipes, party food, ground beef nachos, cheesy nachos, spicy nachos


