Love this? Save it for later!
Share the inspiration with your friends
I was standing in line at the hardware store, of all places, holding a bag of new drawer pulls, when the woman behind me—a retired schoolteacher named Margie—started talking about lunchboxes. Not the metal kind from her teaching days, but the modern bento-style ones her grandkids refused to touch unless the contents were “fun.” She laughed, shaking her head, and said, “You know what finally worked? I rolled everything up.” And just like that, she described these turkey ranch pinwheel roll-ups. I mean, I wasn’t there for cooking advice. I was there for cabinet hardware. But honestly, that conversation changed my entire approach to weekday lunches. Margie’s trick was simple—cream cheese, ranch seasoning, turkey, and a good sturdy tortilla. I scribbled her instructions on the back of my receipt, right there between the paint samples and the lightbulbs.
I made them that very Sunday night, and let me tell you, they were a hit. My kids, who usually pick apart anything assembled, ate them without a single complaint. The best part? They come together in about ten minutes. Maybe you’ve been there—staring into the fridge at 9 PM, wondering what on earth you’re going to pack for tomorrow that won’t come home uneaten. These turkey ranch pinwheel roll-ups are the answer. They’re creamy, tangy, and just a little bit savory, with a texture that holds up beautifully even after hours in a lunchbox. I’ve been making them ever since, tweaking the filling just a touch, but the core idea—that simple, rolled-up magic—is all Margie’s doing.
This recipe has become my secret weapon for busy mornings. It’s the kind of thing you can whip up while the coffee brews, and suddenly, lunch is handled. No stress, no complicated steps. Just a few ingredients, a quick roll, and you’re done. Honestly, I don’t think I’ve gone a single week without making a batch since that day at the hardware store. And every time I slice those little pinwheels, I smile, thinking about Margie and her grandkids.
Why You’ll Love This Recipe
Let’s be real—finding a lunch that’s both kid-approved and actually enjoyable for adults is like finding a unicorn. These turkey ranch pinwheel roll-ups are that unicorn. I’ve tested this recipe on picky eaters, busy parents, and even my own skeptical husband, and it never fails. Here’s why it works:
- Quick & Easy: You’ll need about 10 minutes of active prep time. No cooking, no baking, just assembling and rolling. Perfect for those frantic Sunday meal prep sessions.
- Simple Ingredients: You probably already have cream cheese, tortillas, and deli turkey in your fridge. The ranch seasoning mix is the only “special” item, and it’s a pantry staple for most of us.
- Perfect for Lunchboxes: These hold up incredibly well. No sogginess, no falling apart. They’re sturdy enough for a backpack or a lunch bag.
- Crowd-Pleaser: I’ve brought these to playdates, potlucks, and even a casual book club meeting. They disappear fast. Kids and adults grab them without hesitation.
- Unbelievably Delicious: The combination of cool, creamy ranch cream cheese with savory turkey and a soft tortilla is just… perfect. It’s comfort food in a bite-sized package.
What makes this recipe different from the dozens of other pinwheel recipes out there? It’s the balance. The cream cheese isn’t too thick, the turkey isn’t too dry, and the ranch flavor is present but not overpowering. I’ve learned through trial and error that letting the cream cheese soften properly is the key—cold cream cheese tears the tortillas. Also, rolling them tightly and chilling them for just 15 minutes makes slicing so much cleaner. This isn’t just another version; it’s the one that finally works every single time.
Honestly, this recipe has saved me on more mornings than I can count. It’s the kind of food that makes you feel like you’ve got it all together, even when you’re running on three hours of sleep. And that first bite, when the creamy filling hits your tongue? Pure satisfaction.
What Ingredients You Will Need
This recipe relies on a handful of simple, everyday ingredients that come together to create something surprisingly special. No fancy shopping trips required—you can probably grab most of these from your pantry and fridge right now.
- Large Flour Tortillas (10-inch): You need the big ones, not the taco-sized. Burrito-sized tortillas work best because they give you enough surface area to roll a nice, fat pinwheel. I personally prefer the brand “Mission” for their flexibility—they don’t crack when you roll them.
- 8 oz Cream Cheese, Softened: This is the heart of the filling. Let it sit on the counter for at least 30 minutes before you start. Cold cream cheese is a nightmare to spread and will tear your tortillas. Full-fat gives the best flavor and texture, but Neufchâtel (reduced-fat) works fine too.
- 1 Packet (1 oz) Dry Ranch Seasoning Mix: This is where the magic happens. I use Hidden Valley, but any brand will do. The powder mixes into the cream cheese to create that tangy, herby flavor we all love.
- 6-8 Slices Deli Turkey Breast: Look for oven-roasted or honey-roasted turkey for the best flavor. Avoid the super-thin shaved turkey—it’s too delicate and won’t hold up in the roll. You want slices that are sturdy but not thick. Hillshire Farm or Boar’s Head are my go-to brands.
- 4 Slices Provolone or Swiss Cheese (Optional): This adds a lovely layer of creaminess and a mild, nutty flavor. You can skip it if you want a dairy-light version, but I think it takes the roll-ups to the next level.
- 1/4 Cup Shredded Lettuce or Fresh Spinach: For a little crunch and color. I prefer spinach because it doesn’t get as soggy as lettuce. Make sure it’s thoroughly dried—wet greens will make your pinwheels sad.
A quick note on substitutions: If you’re gluten-free, use large gluten-free tortillas. They can be a bit more brittle, so warm them for 10 seconds in the microwave to make them pliable. For a dairy-free version, use a dairy-free cream cheese alternative (Kite Hill is excellent) and skip the cheese slices. The ranch seasoning is naturally dairy-free, so you’re good there.
I always recommend using high-quality deli meat for this. Thin, cheap turkey can make the roll-ups taste watery. Spend the extra dollar for good turkey—it makes a noticeable difference in texture and flavor. Also, if you want a little heat, add a few dashes of hot sauce or a sprinkle of red pepper flakes to the cream cheese mixture.
Equipment Needed
You don’t need a fancy kitchen to pull these off. Most of these tools you probably already have. Here’s what you’ll need:
- A Sharp Chef’s Knife or Serrated Knife: A sharp knife makes clean slices without squishing the roll. I use a serrated bread knife for the best results—it cuts through the tortilla without dragging the filling.
- A Cutting Board: Preferably a large one so you have room to work. I use a wooden board, but plastic works just fine.
- A Hand Mixer or Fork: To blend the cream cheese and ranch seasoning. A hand mixer makes it fluffy in seconds, but a fork and some elbow grease work too.
- Plastic Wrap or Parchment Paper: For rolling and chilling the pinwheels. Plastic wrap creates a tighter seal, but parchment is more eco-friendly.
- A Baking Sheet or Large Plate: To hold the wrapped rolls in the fridge while they chill.
- Toothpicks (Optional): If you’re packing these for a lunchbox, a toothpick can help keep them from unrolling.
If you don’t have a hand mixer, don’t worry. Just let your cream cheese get really soft—almost room temperature—and mash it with a fork until smooth. It takes an extra minute, but it works. I’ve done it plenty of times when I didn’t feel like dragging out the mixer.
One tip: invest in a good, large cutting board. I used to use a tiny one, and it was a mess trying to roll and slice without everything sliding off. A big board gives you room to breathe.
Preparation Method
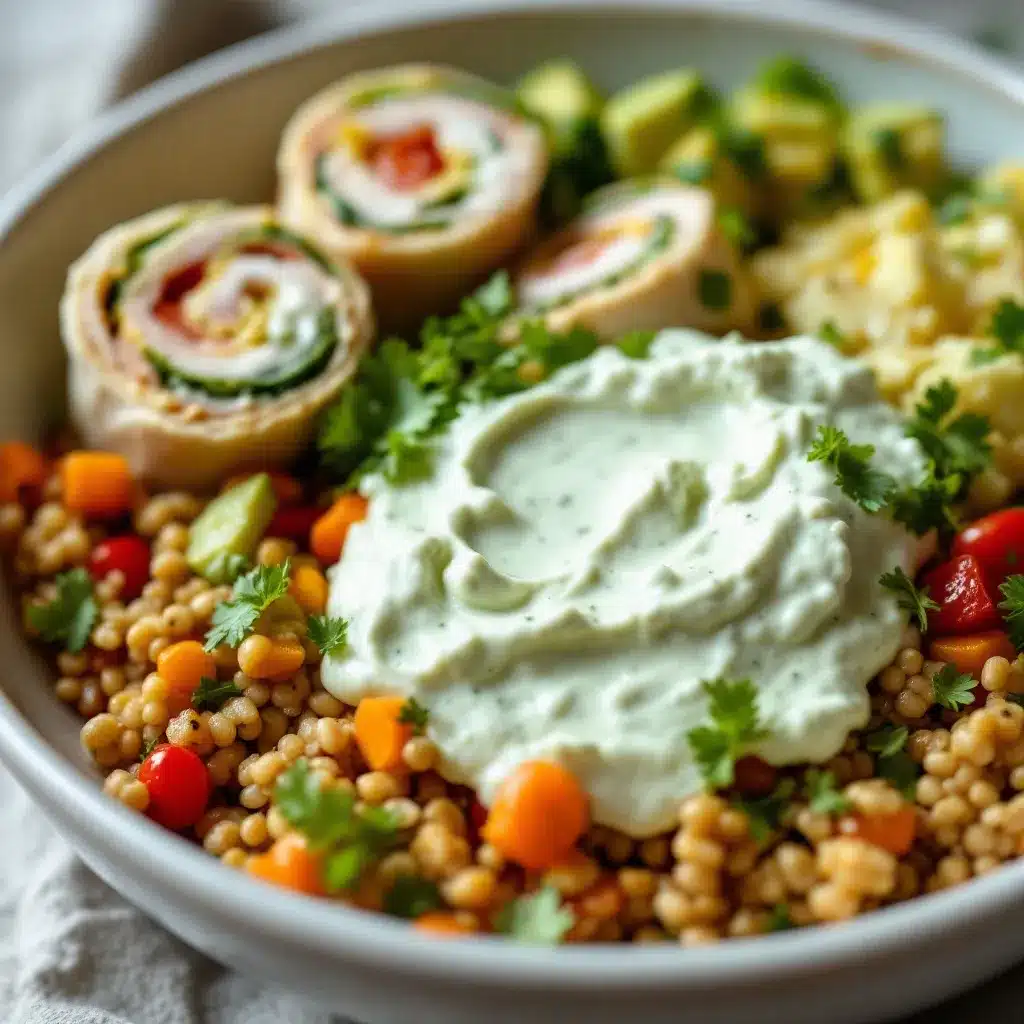
Let’s get rolling! This process is incredibly straightforward, but there are a few little tricks I’ve learned that make a big difference. Follow these steps, and you’ll have perfect pinwheels every time.
- Soften the Cream Cheese: Take your cream cheese out of the fridge about 30-40 minutes before you start. You want it to be soft enough that you can easily press your finger into it. If you’re in a hurry, you can microwave it for 10-15 seconds, but be careful—you don’t want it melted, just softened.
- Mix the Filling: In a medium bowl, combine the softened cream cheese and the entire packet of dry ranch seasoning. Use a hand mixer on low speed, or a sturdy fork, to blend until completely smooth and fluffy. Scrape down the sides of the bowl to make sure everything is incorporated. Taste it—it should be tangy and herby, with a slight saltiness. If you want a little extra zing, add a squeeze of lemon juice.
- Prepare Your Work Surface: Lay a large flour tortilla flat on your cutting board. If your tortillas are a little stiff, warm them in the microwave for 10 seconds—this makes them more pliable and less likely to crack.
- Spread the Filling: Using a spatula or the back of a spoon, spread about 2-3 tablespoons of the ranch cream cheese mixture evenly over the entire surface of the tortilla. Go all the way to the edges—this helps everything stick together. Don’t be afraid to use a generous amount; a thin layer won’t hold the roll.
- Layer the Turkey: Place 2-3 slices of deli turkey flat on top of the cream cheese, slightly overlapping them. Make sure they cover the tortilla from edge to edge. If your turkey slices are small, just patch them together. The goal is an even layer of meat.
- Add Cheese and Greens (Optional): Lay 1 slice of provolone or Swiss cheese on top of the turkey. Then, sprinkle a thin layer of shredded lettuce or a few spinach leaves over the cheese. Don’t overdo the greens—a little goes a long way, and too much will make the roll hard to seal.
- Roll It Tight: Starting at one edge, carefully roll the tortilla as tightly as you can without tearing it. Use your fingers to tuck the filling in as you go. Think of it like rolling a sleeping bag—firm and even. Once it’s rolled, place it seam-side down on the cutting board.
- Wrap and Chill: Tightly wrap the rolled tortilla in plastic wrap or parchment paper. Twist the ends like a candy wrapper to secure it. Place it on a baking sheet or plate and refrigerate for at least 15-20 minutes. This step is crucial—it allows the cream cheese to firm up, which makes slicing much cleaner. If you skip this, you’ll end up with a squished mess.
- Slice the Pinwheels: After chilling, unwrap the roll and place it on your cutting board. Using a sharp serrated knife, slice the roll into 1-inch thick rounds. Use a gentle sawing motion—don’t press straight down, or you’ll crush the roll. You should get about 8-10 pinwheels per tortilla.
- Serve or Store: Arrange the pinwheels on a plate or pack them directly into lunchboxes. They’re ready to go!
A few notes from my own kitchen: If your tortilla cracks while rolling, don’t panic. Just press the crack together—the cream cheese will act like glue. Also, if you’re making a big batch, keep the unused tortillas covered with a damp paper towel so they don’t dry out. And honestly, the first time I made these, I didn’t chill them long enough, and the slices looked like a train wreck. Learn from my mistake—give them that 15 minutes in the fridge. It makes all the difference.
Cooking Tips & Techniques
Over the years, I’ve made these turkey ranch pinwheel roll-ups more times than I can count. And I’ve definitely made my share of mistakes. Here are the tips I wish I’d known from the beginning.
Don’t Overfill: It’s tempting to pile on the turkey and cheese, but too much filling makes the roll impossible to seal. Stick to a thin, even layer of each component. You want the flavors to balance, not fight each other.
The Chill is Non-Negotiable: I cannot stress this enough. Chilling the wrapped roll for at least 15 minutes firms up the cream cheese, which acts as the “glue” holding everything together. If you slice too soon, you’ll get a flat, messy pinwheel. Patience pays off here.
Use a Serrated Knife: A straight chef’s knife tends to squish the roll. A serrated knife, on the other hand, saws through the tortilla cleanly without dragging the filling. I use a bread knife, and it works like a charm.
Keep Your Knife Clean: After every few slices, wipe the blade of your knife with a damp paper towel. This prevents the cream cheese from building up and making a mess of your next cut. It’s a small step that keeps your pinwheels looking beautiful.
Warm Tortillas for Flexibility: If your tortillas are cold or a bit stale, they’ll crack when you roll them. A quick 10-second zap in the microwave makes them soft and pliable. You can also warm them in a dry skillet for a few seconds per side.
Make It a Meal Prep Hero: These pinwheels are perfect for meal prep. You can assemble the rolls (without slicing) up to 2 days in advance. Keep them wrapped tightly in the fridge, then slice them just before serving or packing. This saves time and keeps them fresher.
One of my biggest failures? I once used low-fat cream cheese, and the filling was watery and thin. It didn’t hold the roll together at all. Full-fat cream cheese is the way to go for structure and flavor. Trust me on this one.
Variations & Adaptations
One of the best things about this recipe is how easy it is to customize. I’ve tried a dozen different variations, and they’ve all been delicious. Here are some of my favorites.
- Spicy Southwest Version: Swap the ranch seasoning for a taco seasoning packet. Add a layer of sliced jalapeños and use pepper jack cheese instead of provolone. The result is a zesty, slightly spicy pinwheel that’s perfect for adults.
- Veggie-Packed Version: Skip the turkey and double up on the veggies. Use a layer of roasted red peppers, cucumber slices, and shredded carrots. The cream cheese holds everything together beautifully, and it’s a great way to use up leftover veggies.
- Breakfast Pinwheels: Use the same ranch cream cheese base, but swap the turkey for crispy bacon or breakfast sausage crumbles. Add a thin layer of scrambled eggs. These are amazing for a quick breakfast on the go.
- Gluten-Free Adaptation: Use large gluten-free tortillas. They can be a bit fragile, so warm them thoroughly before rolling. Also, chill them for a full 30 minutes to ensure they hold their shape.
- Low-Carb/Keto Version: Use large lettuce leaves or low-carb tortillas instead of flour tortillas. The filling is naturally low-carb, so you’re just swapping the wrap. Butter lettuce works best—it’s sturdy and flexible.
My personal favorite variation is the “Everything Bagel” version. I mix a tablespoon of everything bagel seasoning into the cream cheese, use smoked salmon instead of turkey, and add a thin layer of capers. It’s like a deli bagel in pinwheel form. Absolutely divine.
Serving & Storage Suggestions
These turkey ranch pinwheel roll-ups are incredibly versatile when it comes to serving. Here’s how I like to enjoy them.
Serving Temperature: They’re best served cold or at room temperature. Straight from the fridge, they’re firm and refreshing. If you’re serving them at a party, let them sit out for about 10 minutes to take the chill off—the flavors become more pronounced.
Presentation: Arrange the pinwheels on a platter with the cut sides facing up so the beautiful spiral is visible. Garnish with a few fresh herb sprigs (dill or parsley work great) or a small bowl of extra ranch dressing for dipping. For lunchboxes, I pack them in a single layer in a container to prevent them from getting squished.
Complementary Dishes: These pair wonderfully with a simple side salad, a cup of tomato soup, or some crunchy veggie sticks. For a heartier meal, serve them alongside a bowl of chili or some roasted sweet potato wedges.
Storage Instructions: Store leftover pinwheels in an airtight container in the refrigerator for up to 3 days. Place a paper towel at the bottom of the container to absorb any excess moisture—this keeps them from getting soggy. Do not freeze them, as the cream cheese will become grainy and watery upon thawing.
Reheating: Honestly, I don’t recommend reheating these. They’re designed to be a cold or room-temperature snack. If you absolutely must warm them, microwave them for 10 seconds, but be aware that the tortilla may become a bit chewy.
One thing I’ve noticed is that the flavors actually meld together and improve after a day in the fridge. So if you can make them a day ahead, they’ll taste even better. The ranch seasoning really sinks into the cream cheese and turkey, creating a more cohesive flavor profile.
Nutritional Information & Benefits
While these pinwheels are definitely a treat, they also offer some solid nutritional benefits. Here’s a rough breakdown per serving (about 4-5 pinwheels, assuming you get 8 per tortilla):
- Calories: Approximately 280-320 calories per serving
- Protein: 18-22 grams (thanks to the turkey and cheese)
- Fat: 16-20 grams (mostly from cream cheese and cheese)
- Carbohydrates: 18-22 grams (from the tortilla)
- Fiber: 1-2 grams
- Sodium: 800-1000 mg (the ranch seasoning and deli meat are the main contributors)
Health Benefits: Turkey breast is a lean source of high-quality protein, which helps keep you full and satisfied. Cream cheese provides calcium and a small amount of vitamin A. If you add spinach, you’re getting iron, vitamin K, and antioxidants. The ranch seasoning, while not a health food, does contain herbs like dill and parsley, which have anti-inflammatory properties.
Dietary Considerations: This recipe is not gluten-free unless you use gluten-free tortillas. It contains dairy from the cream cheese and cheese. For a lower-sodium option, use low-sodium deli turkey and a reduced-sodium ranch seasoning mix. I’ve also made these with a dairy-free cream cheese, and while the texture is slightly different, they’re still delicious.
I personally love that these pinwheels feel indulgent but are actually pretty balanced. They’re not a health food, but they’re a far better choice than a fast-food lunch or a bag of chips. When I pack these for my kids, I feel good knowing they’re getting protein and veggies without any complaints.
Conclusion
So there you have it—my take on the easy turkey ranch pinwheel roll-ups that Margie from the hardware store introduced me to. Honestly, I think about her every time I make them. It’s funny how the best recipes come from the most unexpected places. A stranger in a checkout line, a scribbled note on a receipt, and suddenly, you have a lunchbox hero that saves you time, stress, and the dreaded “what’s for lunch?” question.
I hope you give these a try, and I hope you make them your own. Add your favorite veggies, swap the meat, or double the cheese. The beauty of this recipe is its flexibility. It’s a starting point, not a rulebook. And honestly, that’s what cooking should be—fun, forgiving, and full of little discoveries.
If you make these, I’d love to hear about it. Leave a comment below and tell me how they turned out, or share your own twist on the recipe. Did you add bacon? Use a different seasoning? I’m always looking for new ideas. And if you’re on Pinterest, don’t forget to pin this recipe for later—you’ll thank yourself on a busy Monday morning.
Until next time, happy rolling, and remember: sometimes the best recipes come from the most unlikely sources. Keep your ears open and your cream cheese soft.
Frequently Asked Questions
Can I make these turkey ranch pinwheel roll-ups ahead of time?
Absolutely! You can assemble the rolls (without slicing) up to 2 days in advance. Keep them tightly wrapped in plastic wrap in the refrigerator. Slice them just before serving or packing for the best texture and appearance.
How do I prevent my pinwheels from getting soggy?
The key is to make sure your greens are thoroughly dried before adding them. Also, don’t skip the chilling step—it firms up the cream cheese, which acts as a barrier against moisture. Storing them with a paper towel in the container also helps absorb excess moisture.
Can I use a different type of meat?
Yes! Ham, roast beef, or even grilled chicken strips work beautifully. Smoked salmon is also a fantastic option for a more upscale version. Just make sure the meat is sliced thinly and evenly for easy rolling.
Are these pinwheels suitable for a gluten-free diet?
They can be! Simply swap the flour tortillas for large gluten-free tortillas. Warm them in the microwave for 10-15 seconds to make them pliable, as gluten-free tortillas tend to be more brittle. Chill the rolls for a full 30 minutes before slicing for the best results.
Can I freeze these turkey ranch pinwheel roll-ups?
I don’t recommend freezing them. The cream cheese can become grainy and watery upon thawing, which ruins the texture. They’re best made fresh or stored in the refrigerator for up to 3 days. If you need a longer storage option, prepare the filling separately and assemble fresh when needed.
Pin This Recipe!
Easy Turkey Ranch Pinwheel Roll-Ups Best Lunch Idea

These turkey ranch pinwheel roll-ups are creamy, tangy, and savory, made with cream cheese, ranch seasoning, turkey, and tortillas. They come together in about 10 minutes and are perfect for lunchboxes, parties, or a quick snack.
- Prep Time: 10 minutes
- Cook Time: 0 minutes
- Total Time: 25 minutes (including chilling)
- Yield: 4 servings 1x
- Category: Appetizer
- Cuisine: American
Ingredients
- 4 large flour tortillas (10-inch)
- 8 oz cream cheese, softened
- 1 packet (1 oz) dry ranch seasoning mix
- 6–8 slices deli turkey breast
- 4 slices provolone or Swiss cheese (optional)
- 1/4 cup shredded lettuce or fresh spinach
Instructions
- Soften the cream cheese by letting it sit at room temperature for 30-40 minutes.
- In a medium bowl, combine the softened cream cheese and dry ranch seasoning. Mix with a hand mixer or fork until smooth and fluffy.
- Lay a large flour tortilla flat on a cutting board. If stiff, warm in the microwave for 10 seconds.
- Spread about 2-3 tablespoons of the ranch cream cheese mixture evenly over the entire tortilla, going to the edges.
- Place 2-3 slices of deli turkey flat on top of the cream cheese, slightly overlapping to cover the tortilla.
- If using, lay 1 slice of provolone or Swiss cheese on top of the turkey, then sprinkle a thin layer of shredded lettuce or spinach.
- Starting at one edge, roll the tortilla tightly, tucking the filling in as you go. Place seam-side down.
- Tightly wrap the rolled tortilla in plastic wrap or parchment paper, twisting the ends to secure. Refrigerate for at least 15-20 minutes.
- After chilling, unwrap the roll and slice into 1-inch thick rounds using a sharp serrated knife.
- Serve immediately or pack into lunchboxes. Store leftovers in an airtight container in the refrigerator for up to 3 days.
Notes
Let cream cheese soften properly to avoid tearing tortillas. Chilling the roll for at least 15 minutes is crucial for clean slices. Use a serrated knife for best results. For gluten-free, use large gluten-free tortillas and warm them before rolling. For dairy-free, use dairy-free cream cheese and skip the cheese slices.
Nutrition
- Serving Size: 4-5 pinwheels
- Calories: 300
- Sugar: 2
- Sodium: 900
- Fat: 18
- Saturated Fat: 10
- Carbohydrates: 20
- Fiber: 1
- Protein: 20
Keywords: turkey ranch pinwheel roll-ups, easy lunch idea, kid-friendly lunch, no-cook recipe, pinwheel sandwiches


