Love this? Save it for later!
Share the inspiration with your friends
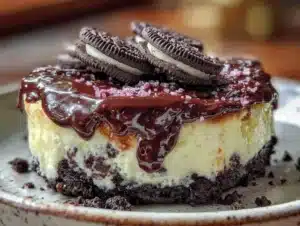
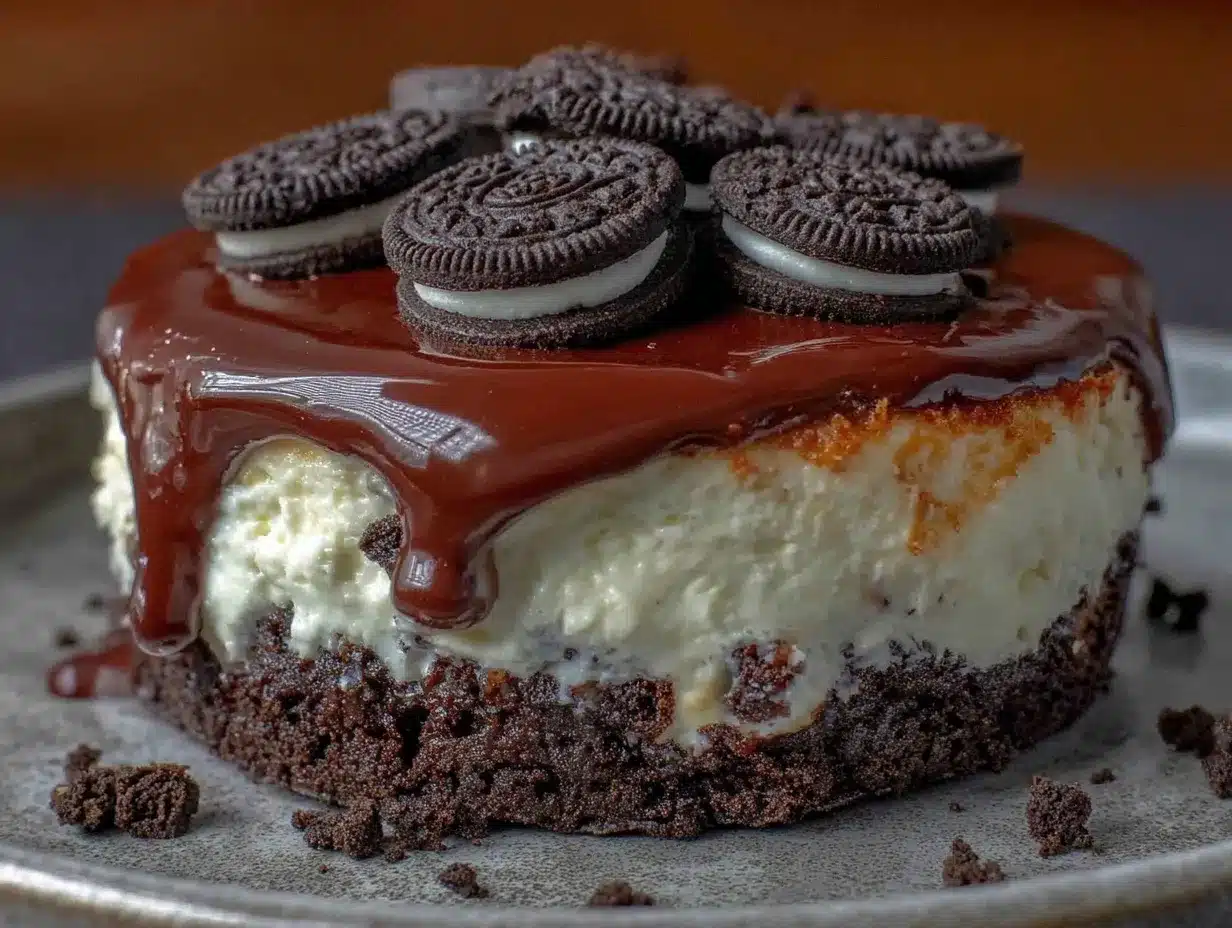
The other evening, I was rummaging through the pantry, trying to find a snack, when the faint, unmistakable aroma of crushed chocolate cookies hit me — and suddenly I was seven again, sitting cross-legged on the linoleum floor of a tiny kitchen in a beachside cottage. My Aunt Marla had just pulled a no-bake Oreo cheesecake from the fridge, the top gleaming with a rich, glossy chocolate ganache. I remember the way the cool, creamy slice melted on my tongue, the crunchy cookie crust giving just enough resistance before it dissolved into sweet, silky bliss. Honestly, trying to recreate that exact feeling has been a bit of a quest for me, especially since Aunt Marla moved halfway across the country and took her recipe with her. You know that feeling when you chase a flavor that seems to hold a whole moment in time? That’s exactly why this Creamy No-Bake Oreo Cheesecake with Chocolate Ganache has become my go-to dessert. I mean, it’s not just about the cheesecake itself — it’s about capturing that cool, indulgent treat on a summer night, with a slight mess made by a too-big dollop of ganache dripping down the side of the pan. Maybe you’ve been there, trying to get every detail right to hold onto a memory that’s just out of reach. This recipe isn’t just a sweet ending to a meal; it’s a little time machine, too.
Why You’ll Love This Recipe
After testing countless no-bake cheesecakes (some disasters, some close calls), this recipe stands out for a few reasons that I’m happy to share:
- Quick & Easy: Ready in under 30 minutes, making it perfect for those last-minute dessert emergencies or lazy weekends.
- Simple Ingredients: No fancy or hard-to-find items — mostly pantry staples and a pack of Oreos.
- Perfect for Any Occasion: Whether it’s a casual get-together, a birthday, or just a sweet treat to yourself, this cheesecake fits right in.
- Crowd-Pleaser: Kids and adults alike can’t get enough — the familiar cookie flavor combined with creamy filling is a hit every time.
- Unbelievably Delicious: The contrast between the crunchy Oreo crust, smooth cheesecake, and silky chocolate ganache is honestly next-level comfort food.
What sets this cheesecake apart? It’s the texture — no grainy bits, just a perfectly smooth, creamy filling thanks to careful whipping and a touch of cream cheese blending. Also, the chocolate ganache topping is super easy but packs a punch of rich flavor that makes every bite feel a little fancy, even if you throw it together in your pajamas. This isn’t just another Oreo cheesecake recipe; it’s the one I come back to when I want that familiar but somehow elevated dessert experience. It’s comfort food with a little flair, and it’s the kind of recipe that makes you close your eyes and savor every bite.
What Ingredients You Will Need
This recipe uses simple, wholesome ingredients to deliver bold flavor and satisfying texture without the fuss. Most of these are pantry staples, so you might already have everything on hand.
- For the Oreo Crust:
- 24 Oreo cookies, finely crushed (about 2 cups) – I prefer the classic original Oreos for that perfect balance of sweetness and crunch
- 6 tbsp unsalted butter, melted (adds richness and helps bind the crust)
- For the Cheesecake Filling:
- 16 oz (450 g) cream cheese, softened (use full-fat for best creaminess)
- 1 cup (240 ml) heavy whipping cream, cold (whipped until stiff peaks form)
- ¾ cup (90 g) powdered sugar (adds subtle sweetness without graininess)
- 1 tsp pure vanilla extract (for depth of flavor)
- Optional: ½ cup (60 g) crushed Oreos folded in for extra texture
- For the Chocolate Ganache Topping:
- 6 oz (170 g) semi-sweet chocolate chips or chopped chocolate (I like Ghirardelli for smooth melting)
- ½ cup (120 ml) heavy cream (warm but not boiling to melt the chocolate)
- 1 tbsp unsalted butter (adds shine and silky texture)
Substitution notes: If you want to make this gluten-free, swap the Oreos for a gluten-free chocolate cookie brand. For a dairy-free version, consider plant-based cream cheese and coconut cream, though the texture will be slightly different. In summer, fresh berries on top can be a nice fresh contrast to the rich ganache.
Equipment Needed
- 9-inch (23 cm) springform pan – makes releasing the cheesecake easy without damage
- Food processor or strong zip-lock bag and rolling pin (for crushing Oreos)
- Electric mixer or stand mixer with whisk attachment (for whipping cream and blending cream cheese)
- Heatproof bowl and small saucepan (for making the ganache)
- Spatulas (silicone ones work best for scraping bowls clean)
- Measuring cups and spoons for accuracy
If you don’t have a springform pan, a regular cake pan lined with parchment paper can work, but the crust release will be trickier. I once tried using a glass pie dish and ended up with a bit of a mess — the cheesecake stuck to the sides more than I liked. For budget-friendly options, a basic hand mixer works just fine, though whipping by hand is doable if you have patience. Just don’t skip chilling your cream cheese — soft but firm is the sweet spot.
Preparation Method
- Prepare the crust: Crush the Oreo cookies finely using a food processor or place them in a zip-lock bag and crush with a rolling pin until you get fine crumbs with some small chunks for texture. Mix the crumbs with melted butter until the mixture resembles wet sand.
- Press crust into pan: Transfer the crust mixture into the springform pan. Press firmly and evenly into the bottom (and slightly up the sides if you like). Use the bottom of a glass or measuring cup for even pressure. Chill in the fridge for at least 15 minutes to set while you prepare the filling.
- Make the cheesecake filling: In a large bowl, beat the softened cream cheese with an electric mixer on medium speed until smooth and creamy (about 2–3 minutes). Add powdered sugar and vanilla extract, and mix again until fully combined.
- Whip the cream: In a separate chilled bowl, whip the cold heavy cream until stiff peaks form. Be careful not to overwhip, or it will become grainy and buttery.
- Combine filling components: Gently fold the whipped cream into the cream cheese mixture using a spatula. Fold carefully to maintain the airy texture. If you want extra Oreo bits, fold in crushed Oreos now.
- Assemble the cheesecake: Spread the filling evenly over the chilled crust, smoothing the top with a spatula. Cover loosely with plastic wrap and refrigerate for at least 4 hours, ideally overnight, to firm up.
- Prepare the chocolate ganache: Heat the heavy cream in a small saucepan over medium heat until it just begins to simmer (don’t boil). Pour over the chocolate in a heatproof bowl. Let sit for 2 minutes, then stir gently until smooth. Add butter and stir until glossy.
- Top the cheesecake: Pour the ganache over the chilled cheesecake, spreading gently to cover the surface. Return to the fridge for 30 minutes to set the ganache before serving.
Tip: If your ganache is too thick to spread easily, warm it slightly over a double boiler or microwave in short bursts. And if your cream cheese had any lumps, don’t fret — a quick extra beat usually smooths it out. Just don’t rush the chilling steps; patience here really pays off in texture!
Cooking Tips & Techniques
One pro tip is to make sure your cream cheese is truly softened before mixing. I once tried rushing this step by microwaving it, and the filling turned out lumpy — not the vibe you want for a silky cheesecake. Let it sit at room temperature for about an hour for best results.
When folding whipped cream into the cream cheese, think gentle and deliberate. You want to keep as much air in the mixture as possible for that light, creamy texture. Overmixing will deflate the whipped cream and make the filling dense.
For the ganache, the temperature of the cream is key. Too hot and it can seize the chocolate; too cool and it won’t melt properly. Letting the cream just simmer before pouring is the sweet spot. Also, stirring slowly and patiently helps get that mirror-like shine.
If you’re multitasking, chill the crust first while you prepare the filling. It keeps things moving smoothly. And a quick wipe of warm water on a spatula before smoothing the filling can give you that perfect glassy finish.
Lastly, don’t skip the refrigeration time after assembly. It helps the cheesecake firm up and marry flavors. I usually make this a day ahead — it tastes even better the next day!
Variations & Adaptations
Looking to tweak this Creamy No-Bake Oreo Cheesecake with Chocolate Ganache? Here are some ideas to try out:
- Fruit Twist: Add a layer of fresh raspberries or strawberries between the crust and filling for a tart contrast.
- Peanut Butter Swirl: Gently swirl melted peanut butter into the cheesecake filling before chilling for a nutty surprise.
- Mint Chocolate: Add a few drops of peppermint extract to the filling and garnish with crushed mint Oreos or fresh mint leaves.
- Vegan Friendly: Use dairy-free cream cheese and coconut cream for the filling, vegan Oreos (which are often dairy-free), and a coconut oil-based ganache.
- Alternative Crust: Swap Oreos for crushed graham crackers or chocolate wafer cookies for a different texture and flavor.
I once tried a salted caramel drizzle over the ganache, and honestly, it was a game-changer — sweet, salty, and ultra-rich. Feel free to experiment with flavors that suit your taste buds!
Serving & Storage Suggestions
This cheesecake is best served chilled, straight from the fridge, so the filling holds its creamy texture and the ganache stays firm. A sharp knife dipped in hot water and wiped dry helps cut neat slices without cracking the ganache.
Pair it with fresh berries or a dollop of whipped cream for a fresh balance. It also goes surprisingly well with a strong cup of coffee or a glass of cold milk.
Store leftovers covered tightly in the refrigerator for up to 4 days. For longer storage, you can freeze the cheesecake (without ganache) wrapped in plastic and foil for up to 1 month. Thaw in the fridge overnight, then add fresh ganache topping before serving.
Flavors tend to deepen after a day or two, so if you can wait, it’s worth making ahead of time. Just keep it well wrapped to avoid absorbing fridge odors.
Nutritional Information & Benefits
Estimated per serving (based on 12 slices):
| Calories | 320 |
|---|---|
| Fat | 24g |
| Carbohydrates | 25g |
| Protein | 4g |
The cream cheese and heavy cream provide a good dose of calcium and vitamin A, while the Oreos add a sweet crunch that makes the dessert feel indulgent. For those keeping an eye on gluten, using gluten-free cookies can easily adapt this recipe. Though rich, it’s a treat worth savoring mindfully — a little slice can go a long way in satisfying sweet cravings without too much fuss.
Conclusion
This Creamy No-Bake Oreo Cheesecake with Chocolate Ganache is honestly one of those recipes that sticks with you — not just for its delicious flavor, but for the memories and moments it brings back. It’s easy to customize, quick to prepare, and has that perfect balance of creamy, crunchy, and chocolatey that makes dessert feel like a celebration. I love making it when I want something impressive but stress-free, and I hope you give it a try too. Don’t hesitate to experiment with your own twists, and please share how yours turns out — I’m always excited to hear your adaptations and stories!
FAQs
Can I make this cheesecake ahead of time?
Absolutely! It actually tastes better after chilling overnight, allowing the flavors to meld and the texture to firm up perfectly.
What if I don’t have a springform pan?
You can use a regular cake pan lined with parchment paper, but be careful when removing the cheesecake, as the crust might stick more.
How do I prevent the ganache from cracking?
Use warm (not boiling) cream to melt the chocolate and stir gently until smooth. Let the ganache set in the fridge but avoid freezing it.
Can I use low-fat cream cheese or milk?
Low-fat options may affect the texture, making it less creamy. For best results, full-fat cream cheese and heavy cream are recommended.
Is it possible to freeze the whole cheesecake?
Yes, freeze without the ganache topping. Wrap tightly and thaw in the fridge overnight before adding fresh ganache and serving.
For those who enjoy creative twists on classic desserts, this recipe pairs nicely with other luscious treats like crispy garlic chicken for a full meal or a sweet finish after a fresh summer salad.
Pin This Recipe!
Creamy No-Bake Oreo Cheesecake Recipe with Easy Chocolate Ganache Topping
A quick and easy no-bake Oreo cheesecake with a crunchy cookie crust, smooth creamy filling, and a rich chocolate ganache topping. Perfect for any occasion and ready in under 30 minutes.
- Prep Time: 15 minutes
- Cook Time: 0 minutes
- Total Time: 4 hours 45 minutes
- Yield: 12 servings 1x
- Category: Dessert
- Cuisine: American
Ingredients
- 24 Oreo cookies, finely crushed (about 2 cups)
- 6 tbsp unsalted butter, melted
- 16 oz (450 g) cream cheese, softened
- 1 cup (240 ml) heavy whipping cream, cold
- 3/4 cup (90 g) powdered sugar
- 1 tsp pure vanilla extract
- Optional: 1/2 cup (60 g) crushed Oreos folded in
- 6 oz (170 g) semi-sweet chocolate chips or chopped chocolate
- 1/2 cup (120 ml) heavy cream
- 1 tbsp unsalted butter
Instructions
- Crush the Oreo cookies finely using a food processor or place them in a zip-lock bag and crush with a rolling pin until you get fine crumbs with some small chunks for texture. Mix the crumbs with melted butter until the mixture resembles wet sand.
- Transfer the crust mixture into the springform pan. Press firmly and evenly into the bottom (and slightly up the sides if you like). Use the bottom of a glass or measuring cup for even pressure. Chill in the fridge for at least 15 minutes to set while you prepare the filling.
- In a large bowl, beat the softened cream cheese with an electric mixer on medium speed until smooth and creamy (about 2–3 minutes). Add powdered sugar and vanilla extract, and mix again until fully combined.
- In a separate chilled bowl, whip the cold heavy cream until stiff peaks form. Be careful not to overwhip, or it will become grainy and buttery.
- Gently fold the whipped cream into the cream cheese mixture using a spatula. Fold carefully to maintain the airy texture. If you want extra Oreo bits, fold in crushed Oreos now.
- Spread the filling evenly over the chilled crust, smoothing the top with a spatula. Cover loosely with plastic wrap and refrigerate for at least 4 hours, ideally overnight, to firm up.
- Heat the heavy cream in a small saucepan over medium heat until it just begins to simmer (do not boil). Pour over the chocolate in a heatproof bowl. Let sit for 2 minutes, then stir gently until smooth. Add butter and stir until glossy.
- Pour the ganache over the chilled cheesecake, spreading gently to cover the surface. Return to the fridge for 30 minutes to set the ganache before serving.
Notes
Ensure cream cheese is softened to avoid lumps. Fold whipped cream gently to keep the filling airy. Use warm (not boiling) cream for ganache to prevent seizing. Chill crust before adding filling and refrigerate assembled cheesecake for at least 4 hours or overnight for best texture. Warm ganache slightly if too thick to spread.
Nutrition
- Serving Size: 1 slice (1/12th of c
- Calories: 320
- Fat: 24
- Carbohydrates: 25
- Protein: 4
Keywords: no-bake cheesecake, Oreo cheesecake, chocolate ganache, easy dessert, no-bake dessert, creamy cheesecake, Oreo crust