Love this? Save it for later!
Share the inspiration with your friends
The slick, dark sheen of the chocolate shell cracking under my thumb—that’s the whole point. I didn’t set out to make these black cat Oreo truffles for the taste alone, though they are dangerously good. It was that specific snap, followed by the soft, creamy interior that feels almost like a secret. Everything else, the whiskers, the little ears, the tiny candy eyes, is just the costume for that perfect bite.
I was standing in my kitchen last October, staring at a bag of Halloween candy I’d bought “for the trick-or-treaters” (we all know how that goes). I had a block of cream cheese, a family-size package of Oreos, and a desperate need to make something that felt more intentional than just eating cookies straight from the sleeve. My first attempt was a mess—the eyes slid off, the “ears” looked more like tumors, and I almost gave up. But then I remembered a trick from making my brown butter banana bread, where patience with chilling is everything. I let the ganache set longer, used a toothpick to guide the candy eyes, and suddenly, a tiny black cat face stared back at me from the baking sheet. It was ridiculous and perfect.
These aren’t just truffles. They’re the kind of treat that makes people stop, laugh, and take a picture before they even take a bite. And honestly, that moment of delight is the real reason this recipe stuck.
Why You’ll Love This Recipe
I have tested these black cat Oreo truffles more times than I care to admit. I’ve tried different brands of chocolate, different chilling times, and even different ways to form the ears. What I landed on is a recipe that is genuinely foolproof, even for a beginner baker. You don’t need a stand mixer, a piping bag, or any special skills.
- No-Bake & Quick : These come together in about 30 minutes of active time. The hardest part is waiting for them to chill in the fridge.
- Simple Ingredients : You likely have everything already. Oreos, cream cheese, chocolate chips, and a few candy decorations. No fancy extracts or hard-to-find items.
- Perfect for Halloween Parties : These are the star of any spooky spread. They are cute enough for a kid’s classroom party but elegant enough for a Halloween cocktail hour.
- Crowd-Pleaser : I have yet to meet someone who doesn’t love an Oreo truffle. The black cat shape just makes them more fun. Kids and adults fight over the last one.
- Unbelievably Delicious : The contrast between the crunchy chocolate shell and the soft, fudge-like center is next-level comfort food. It tastes like a fancy bakery treat, but it’s just crushed cookies and cream cheese.
What makes these different from every other Oreo ball recipe? It’s the technique for the ears. Instead of trying to shape the truffle mixture into a perfect cat head (which never works), you dip the ball first, then attach the ear pieces while the chocolate is still wet. This creates a clean, professional look that doesn’t require any sculpting talent. This isn’t just another version—it’s your best version.
This recipe is the kind that makes you close your eyes after the first bite. It’s comfort food reimagined for spooky season—faster, easier, but with the same soul-soothing satisfaction. Perfect for impressing guests without stress, or turning a simple Halloween night into something memorable.
What Ingredients You Will Need
This recipe uses simple, store-bought ingredients to deliver a treat that looks and tastes like it came from a specialty bakery. The magic is all in the assembly.
- Oreo Cookies (1 family-size package, about 36 cookies) : Do not use the double-stuf variety. The extra cream filling makes the truffle mixture too soft to hold its shape. I prefer the classic black Oreos for the color, but the golden ones work in a pinch (your cats will just be lighter in color).
- Cream Cheese (8 oz block, softened) : This is non-negotiable. Do not use low-fat or whipped cream cheese. The full-fat block provides the necessary structure and richness. Let it sit on the counter for 30 minutes before you start so it blends smoothly.
- Semi-Sweet Chocolate Chips (12 oz bag) : I recommend Ghirardelli or Guittard for the best melt and shine. Chocolate chips contain stabilizers that help them set up firmly, which is crucial for the shell.
- Coconut Oil (1 teaspoon) : This is optional but a game-changer. It thins the melted chocolate just enough for a smooth, even dip and gives the finished truffle a beautiful glossy sheen.
- Candy Eyes (small, about ¼ inch) : You can find these at any craft store or online. Buy the ones that are flat on the back for easy sticking.
- Black Jimmies Sprinkles (for whiskers) : These thin, rod-shaped sprinkles are perfect for whiskers. You can also use black licorice strings cut into tiny pieces, but jimmies are much easier.
- Orange or Yellow Candy Melts (for the nose, optional) : A tiny dot of melted orange candy melt makes the cutest little nose. You can also use a dab of orange frosting from a tube.
I have found that the quality of the Oreo makes a difference. The off-brand versions don’t crush as finely, leaving chunks that ruin the smooth texture of the truffle center. Stick with the real deal for this one. If you want to make these gluten-free, use gluten-free Oreo-style cookies. The texture will be slightly different, but the flavor is still amazing.
Equipment Needed
You don’t need a fancy kitchen to pull these off. A few basic tools will get the job done beautifully.
- Food Processor or Blender : This is the fastest way to crush the Oreos into a fine crumb. You can also place them in a zip-top bag and crush them with a rolling pin, but it takes more effort and you’ll get uneven crumbs.
- Large Mixing Bowl : For combining the cookie crumbs and cream cheese.
- Baking Sheet : To hold the truffles while they chill. Line it with parchment paper or a silicone baking mat for easy removal.
- Microwave-Safe Bowl : For melting the chocolate. Glass or ceramic works best.
- Fork or Dipping Tool : A regular dinner fork works fine for dipping. I prefer a chocolate dipping tool with a spiral handle, but a fork is perfectly fine.
- Toothpicks : Essential for placing the candy eyes and whiskers. They give you precision that your fingers can’t.
- Piping Bag or Small Zip-Top Bag : For drizzling the orange nose or any additional chocolate details. A tiny corner snipped off a zip-top bag works perfectly.
I learned the hard way that a cheap baking sheet can cause the chocolate to cool unevenly. Use a sturdy, flat sheet. My first batch of truffles had a weird, mottled finish because my old pan was warped. A good sheet makes a difference.
Preparation Method
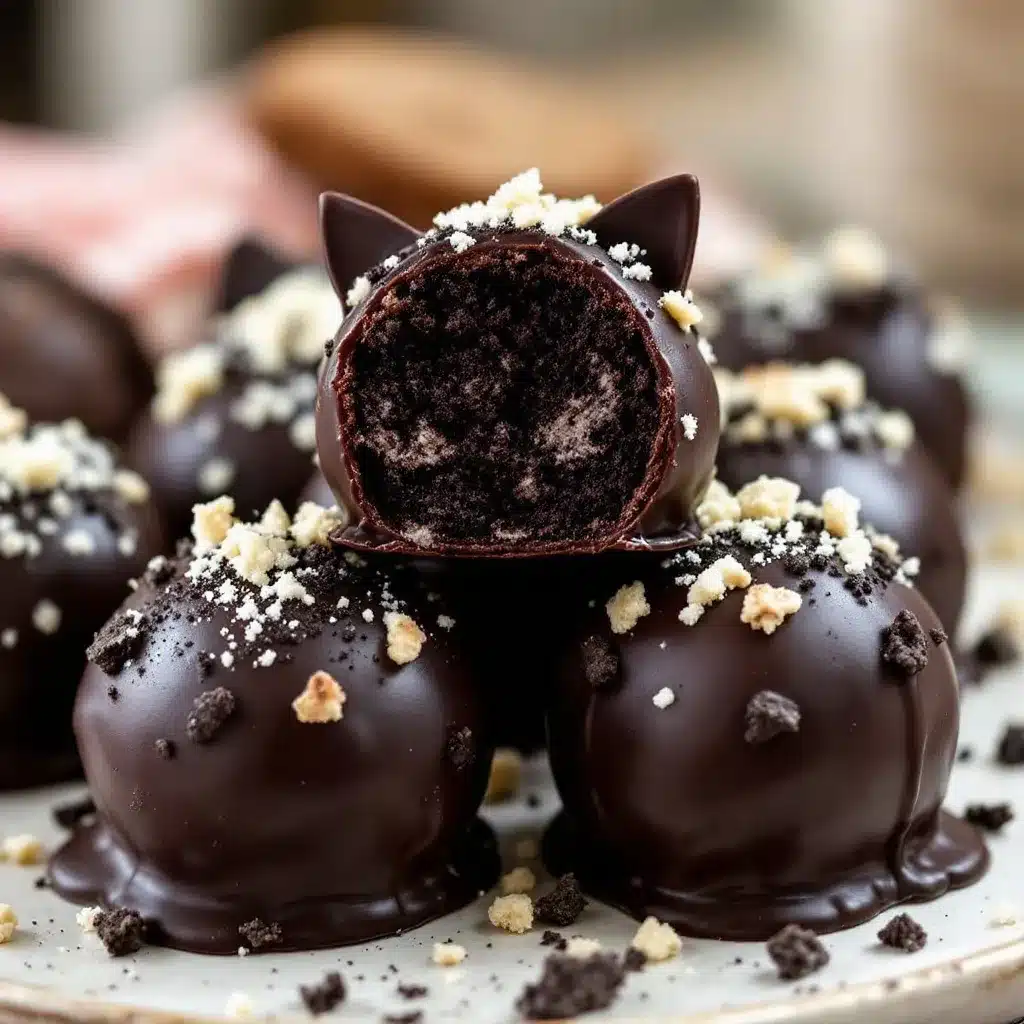
This method is broken down into simple stages. Don’t rush the chilling steps—they are crucial for a clean, professional look.
- Crush the Oreos (5 minutes) : Place all 36 Oreos (filling and all) into your food processor. Pulse until you have a fine, sand-like crumb. There should be no visible chunks of cookie. If you are using the bag-and-rolling-pin method, crush them until they are very fine. Set aside 2 tablespoons of the crumbs for decoration if you want a “dirt” look on the final plate.
- Make the Truffle Base (5 minutes) : In a large mixing bowl, combine the crushed Oreos with the softened cream cheese. Use a spatula or your hands (gloved hands work best) to mix until everything is fully incorporated. The mixture should hold together when squeezed in your fist. If it feels too dry, add one more tablespoon of cream cheese. If it feels too sticky, add a few more crushed cookies.
- Form the Truffle Balls (15 minutes) : Scoop out about 1 tablespoon of the mixture and roll it into a smooth ball. Place it on the parchment-lined baking sheet. Repeat until all the mixture is used. You should get about 24 to 28 balls. Place the baking sheet in the refrigerator for at least 30 minutes. This step is critical. The balls need to be very firm so they don’t fall apart during dipping.
- Prepare the Chocolate Shell (10 minutes) : While the truffles chill, place the semi-sweet chocolate chips and coconut oil in a microwave-safe bowl. Microwave in 30-second intervals, stirring vigorously after each interval. Stop when the chocolate is mostly melted but a few small lumps remain. Stir continuously until the residual heat melts the last lumps completely. Do not overheat the chocolate or it will seize up and become grainy.
- Dip the Truffles (20 minutes) : Remove the chilled truffle balls from the fridge. Working with one ball at a time, drop it into the melted chocolate. Use a fork to roll it around until it’s fully coated. Lift it out with the fork and gently tap the fork on the edge of the bowl to let excess chocolate drip off. Carefully slide the truffle off the fork and back onto the parchment paper. The chocolate should look smooth and glossy.
- Attach the Cat Features (Immediately, 15 minutes) : This step must be done while the chocolate is still wet. If it starts to set, the decorations won’t stick.
- Ears : Take a second truffle ball (undipped) and pinch off two tiny pieces, each about the size of a small pea. Roll them into little triangles. Gently press them onto the top of the dipped truffle ball, angling them slightly outward like cat ears.
- Eyes : Use a toothpick to dab a tiny bit of melted chocolate onto the back of a candy eye. Place it on the truffle. Repeat for the second eye.
- Whiskers : Using a toothpick, gently press three black jimmies into the chocolate on each side of the truffle, radiating outward from where the nose will go.
- Nose : Place a tiny dot of orange candy melt or frosting in the center, just below the eyes.
- Final Chill (15 minutes) : Once all the truffles are decorated, return the baking sheet to the refrigerator for at least 15 minutes to allow the chocolate shell to set completely. The chocolate should be firm to the touch and have a satisfying snap when you bite into it.
Pro Tip : If the chocolate in your bowl starts to thicken as you work, pop it back in the microwave for 10 seconds and stir. Thin chocolate is the key to a smooth, even coating.
Cooking Tips & Techniques
I have messed up this recipe more times than I’ve gotten it right. Here are the hard-earned lessons I’ve learned so you don’t have to repeat them.
The Biggest Mistake: Warm Hands : The truffle mixture is very sensitive to heat. If your hands are warm, the cream cheese will soften, and the balls will become sticky and hard to roll. Run your hands under cold water before you start rolling, or wear disposable gloves. This one tip will save you from a sticky, frustrating mess.
The Chocolate Seize-Up : I once ruined an entire bag of chocolate because a single drop of water fell into the bowl. Water is chocolate’s enemy. Make sure your bowl and spoon are bone-dry. If your chocolate does seize up (becomes thick, lumpy, and grainy), you can sometimes save it by stirring in a teaspoon of vegetable oil, but it’s usually better to start over.
Multitasking Strategy : Do not try to dip all the truffles and then go back to add the decorations. The chocolate sets faster than you think. Dip one truffle, decorate it immediately, then move to the next. This assembly-line approach keeps the chocolate wet and the decorations sticking perfectly.
Consistency is Key : The truffle mixture should feel like soft Play-Doh. If it’s too dry, it will crumble. If it’s too wet, it will be impossible to dip. The humidity of your kitchen can affect this. On a rainy day, you might need an extra cookie or two. On a dry day, you might need a tiny bit more cream cheese. Trust your hands.
I once tried to speed up the chilling process by putting the truffles in the freezer. Do not do this. The extreme cold causes the chocolate to crack as it contracts. The fridge is the only way to go.
Variations & Adaptations
These black cat Oreo truffles are a fantastic base for creativity. Here are some ways I’ve adapted them for different occasions and dietary needs.
- Spooky Spider Truffles : Skip the cat ears. After dipping, use black licorice strings to create eight spider legs sticking out from the sides. Add two large candy eyes on top. These are especially fun for a Halloween party where you want a variety of creatures.
- White Chocolate Ghosts : Use white chocolate instead of semi-sweet for the shell. Shape the truffle mixture into a slight teardrop shape. After dipping, use two mini chocolate chips for eyes and a tiny dot of black frosting for a mouth. They look like adorable little ghosts.
- Gluten-Free Version : Substitute the Oreos with gluten-free chocolate sandwich cookies. The texture of the truffle will be slightly more crumbly, but the flavor is still incredible. Just be sure to crush them very finely.
- Peppermint Black Cats : Add ½ teaspoon of peppermint extract to the truffle mixture before rolling. After dipping, sprinkle the top of each truffle with crushed candy canes. This is a fantastic Christmas variation that still uses the cute cat shape.
- Vegan Adaptation : Use vegan cream cheese (like Kite Hill or Tofutti) and vegan chocolate chips. Ensure your Oreos are labeled vegan (original Oreos are, but some flavors are not). The texture will be slightly softer, so you may need to chill the truffle balls for an extra 15 minutes before dipping.
My personal favorite variation is the pumpkin spice black cat. I add 1 teaspoon of pumpkin pie spice to the truffle mixture and use orange candy melts for the nose. It tastes like fall in a bite.
Serving & Storage Suggestions
These truffles are best served chilled, straight from the refrigerator. The cold temperature keeps the chocolate shell firm and the center perfectly fudge-like. Arrange them on a platter with a sprinkle of the reserved Oreo crumbs to look like dirt.
Complementary Pairings : These truffles are rich, so they pair beautifully with a glass of cold milk, a hot coffee, or a dark stout beer for an adult twist. For a Halloween dessert board, arrange them alongside whipped feta and seasonal fruit for a sweet-savory contrast. They also go wonderfully with a simple fruit salad to cut the richness.
Storage Instructions : Store the truffles in an airtight container in the refrigerator. They will stay fresh for up to one week, though I doubt they will last that long. Layer them between sheets of parchment paper to prevent the decorations from smudging or sticking.
Freezer Instructions : These truffles freeze exceptionally well. Place them on a baking sheet in a single layer and freeze for 1 hour, or until solid. Transfer the frozen truffles to a freezer-safe bag or container. They will keep for up to 3 months. To serve, thaw them in the refrigerator for 2-3 hours. The texture remains perfect.
Flavor Development : Interestingly, the flavor of these truffles actually improves after a day in the fridge. The moisture from the cream cheese distributes more evenly through the cookie crumbs, creating an even softer, more cohesive center. If you can, make them a day ahead of your event.
Nutritional Information & Benefits
Let’s be honest—these are a treat, not a health food. But knowing what’s in them helps you enjoy them mindfully.
Estimated Nutritional Values (per truffle, based on 24 servings) :
| Nutrient | Amount |
|---|---|
| Calories | 185 kcal |
| Total Fat | 11 g |
| Saturated Fat | 6 g |
| Carbohydrates | 21 g |
| Sugar | 15 g |
| Protein | 2 g |
Health Benefits : While these aren’t a protein-packed meal like my healthy egg white breakfast burrito, the dark chocolate does contain antioxidants called flavonoids. The cream cheese provides a small amount of calcium. The real benefit is the joy they bring—sometimes, a little indulgence is exactly what the soul needs.
Dietary Considerations : This recipe is not gluten-free (unless using GF cookies) and contains dairy. It is vegetarian. For a lower-sugar option, use sugar-free chocolate chips and Oreo Thins. The taste will be slightly different, but the texture remains great.
Conclusion
These easy black cat Oreo truffles are more than just a Halloween dessert. They are a little moment of joy, a tiny edible sculpture that brings a smile to everyone who sees it. The combination of the crunchy chocolate shell and the soft, fudge-like center is genuinely irresistible.
I encourage you to make these your own. Add a little extra vanilla, use white chocolate, or give them googly eyes. The base recipe is so forgiving that you can really play with it. That is the beauty of a simple recipe done right.
I love these truffles because they remind me that you don’t need to be a professional pastry chef to create something beautiful. You just need a little patience, a few good ingredients, and the willingness to have fun with your food. So go ahead, make a batch. And when your friends ask where you bought them, just smile and say, “I made them.”
Have you tried this recipe? I would love to hear about your variations! Drop a comment below and tell me what kind of spooky creatures you created. And if you loved it, share this post with a friend who needs a little Halloween magic in their life.
Frequently Asked Questions
Can I use double-stuf Oreos for this recipe?
I do not recommend it. The extra cream filling makes the truffle mixture too soft and sticky. It will be very difficult to roll into balls, and the finished truffles may not hold their shape well during dipping. Stick with the classic Oreos for the best results.
How do I keep the candy eyes from sliding off?
The key is to attach the eyes while the chocolate coating is still wet. If you wait even a minute too long, the chocolate will start to set and the eyes won’t stick. Work on one truffle at a time. If the chocolate does start to set, dip the back of the eye in a tiny bit of fresh melted chocolate before placing it.
Can I make these truffles ahead of time?
Absolutely. In fact, I recommend it. The flavor improves after a day in the fridge. You can make the truffle mixture and roll the balls up to two days in advance. Store them in the fridge, then dip and decorate them the day you plan to serve them. They also freeze beautifully for up to three months.
My chocolate is too thick for dipping. What do I do?
If your chocolate is too thick, it likely means it has slightly overheated or you are using a chocolate that isn’t meant for dipping. Stir in 1 teaspoon of coconut oil or vegetable shortening. This will thin the chocolate out and give it a beautiful glossy shine. Do not add water, as this will ruin the chocolate.
How do I make the cat ears look neat and not messy?
The trick is to use undipped truffle mixture for the ears. Pinch off a very small piece (about the size of a pea), roll it into a tiny triangle, and press it onto the dipped truffle while the chocolate is still wet. The chocolate will act as glue. If you try to shape the ears from the dipped truffle itself, you will just make a mess.
Pin This Recipe!

Easy Black Cat Oreo Truffles: Best Halloween Dessert

These no-bake black cat Oreo truffles feature a crunchy chocolate shell and a soft, fudge-like center, decorated to look like adorable black cats. Perfect for Halloween parties, they are quick to make and guaranteed to delight both kids and adults.
- Prep Time: 30 minutes
- Cook Time: 0 minutes
- Total Time: 1 hour 15 minutes (includes chilling)
- Yield: 24-28 truffles 1x
- Category: Dessert
- Cuisine: American
Ingredients
- 1 family-size package Oreo cookies (about 36 cookies)
- 8 oz cream cheese, softened (full-fat block)
- 12 oz semi-sweet chocolate chips
- 1 teaspoon coconut oil (optional)
- Small candy eyes (about ¼ inch, flat on back)
- Black jimmies sprinkles (for whiskers)
- Orange or yellow candy melts (for nose, optional)
Instructions
- Crush all 36 Oreos (filling and all) in a food processor until you have a fine, sand-like crumb. Set aside 2 tablespoons for decoration if desired.
- In a large mixing bowl, combine the crushed Oreos with the softened cream cheese. Mix with a spatula or gloved hands until fully incorporated. The mixture should hold together when squeezed.
- Scoop out about 1 tablespoon of the mixture and roll into a smooth ball. Place on a parchment-lined baking sheet. Repeat until all mixture is used (about 24-28 balls). Refrigerate for at least 30 minutes until very firm.
- Place semi-sweet chocolate chips and coconut oil in a microwave-safe bowl. Microwave in 30-second intervals, stirring after each, until mostly melted. Stir until smooth. Do not overheat.
- Remove chilled truffle balls from fridge. Working one at a time, drop a ball into melted chocolate, roll with a fork to coat, then lift and tap off excess. Slide back onto parchment.
- Immediately while chocolate is wet: pinch off tiny pieces of undipped truffle mixture, roll into small triangles, and press onto the top for ears. Use a toothpick to dab melted chocolate on candy eyes and place them. Press three black jimmies on each side for whiskers. Add a tiny dot of orange candy melt for the nose.
- Return baking sheet to refrigerator for at least 15 minutes to set the chocolate shell completely.
Notes
Do not use double-stuf Oreos; the extra filling makes the mixture too soft. Attach decorations while chocolate is still wet. If chocolate thickens, microwave for 10 seconds and stir. For best results, chill truffles for at least 30 minutes before dipping. Store in an airtight container in the refrigerator for up to 1 week, or freeze for up to 3 months.
Nutrition
- Serving Size: 1 truffle
- Calories: 185
- Sugar: 15
- Sodium: 95
- Fat: 11
- Saturated Fat: 6
- Carbohydrates: 21
- Fiber: 1
- Protein: 2
Keywords: Halloween dessert, Oreo truffles, black cat truffles, no-bake dessert, easy Halloween treat, chocolate truffles


