Love this? Save it for later!
Share the inspiration with your friends
“You better believe I forgot the nuts,” my friend Lisa said with a sheepish grin, holding up a tray of what looked like perfectly festive July 4th treats. It was the morning of the school celebration, and we’d both been tasked with bringing desserts. Turns out, Lisa’s daughter’s class was strictly nut-free, and that meant no sneaky pecans or almonds hiding in any recipe. Honestly, I didn’t realize how tricky it could be to whip up delicious July 4th desserts safe for school celebrations—especially when you want them to look fun and taste incredible.
That day, amidst the chaos of last-minute baking and a kitchen dusted with flour and red, white, and blue sprinkles, I learned that crafting nut-free desserts isn’t just about swapping ingredients. It’s about making sure every child can enjoy the sweet flavors of summer without worry. Maybe you’ve been there too—scrambling to find recipes that are both safe and crowd-pleasing for a nut-allergy-aware event.
Let me tell you, these nut-free July 4th desserts became my go-to for every school party since. They’re easy, colorful, and honestly, the kind of treats that make you pause and smile after the first bite. Whether you’re a seasoned baker or a last-minute planner, these recipes are your ticket to stress-free, safe celebrations that kids and adults alike will love.
Why You’ll Love This Recipe
After countless trial runs and tasting sessions (mostly by the neighborhood kids, who are the toughest critics), I can confidently say these nut-free July 4th desserts are a game-changer for school celebrations. Here’s why they might just become your new favorites:
- Quick & Easy: Each dessert comes together in under 30 minutes, perfect for those busy mornings before school or spontaneous get-togethers.
- Simple Ingredients: No need to hunt down exotic items—most ingredients are pantry staples you probably already have on hand.
- Perfect for School Events: All recipes are nut-free and allergy-friendly, giving peace of mind for teachers and parents alike.
- Crowd-Pleaser: The vibrant red, white, and blue themes make these desserts as fun to look at as they are to eat—kids especially adore the playful presentation.
- Unbelievably Delicious: The textures and flavors hit that sweet spot—moist, soft, and just the right amount of festive sweetness.
What sets these recipes apart is the attention to detail—like swapping out nut flours for oat or rice flours to keep the texture light, or using fresh berries for a natural pop of color and flavor instead of processed dyes. Plus, I’ve tested these recipes multiple times to make sure they’re foolproof for bakers of all skill levels.
Honestly, there’s something heartwarming about sharing a dessert everyone can safely enjoy, especially during a celebration that brings communities together. These nut-free July 4th desserts aren’t just treats; they’re little moments of joy and inclusion wrapped up in festive flavors.
What Ingredients You Will Need
This collection of nut-free July 4th desserts uses simple, wholesome ingredients to bring bold flavor and fun presentation without any of the usual nut-related worries. Most ingredients are easy to find, with a few tips to tweak depending on your pantry and preferences.
- For the Base or Batter:
- All-purpose flour (you can substitute with oat or rice flour for gluten sensitivity)
- Baking powder and baking soda (for that perfect rise)
- Granulated sugar and brown sugar (adds moisture and sweetness)
- Unsalted butter, softened (I prefer Land O Lakes for consistent creaminess)
- Large eggs, room temperature (helps with binding and texture)
- Whole milk or dairy-free milk alternative (almond milk should be avoided here, try oat or soy milk instead)
- Vanilla extract (pure, for a clean flavor)
- For the Toppings and Decorations:
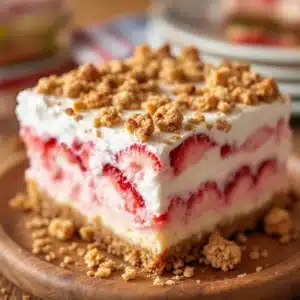
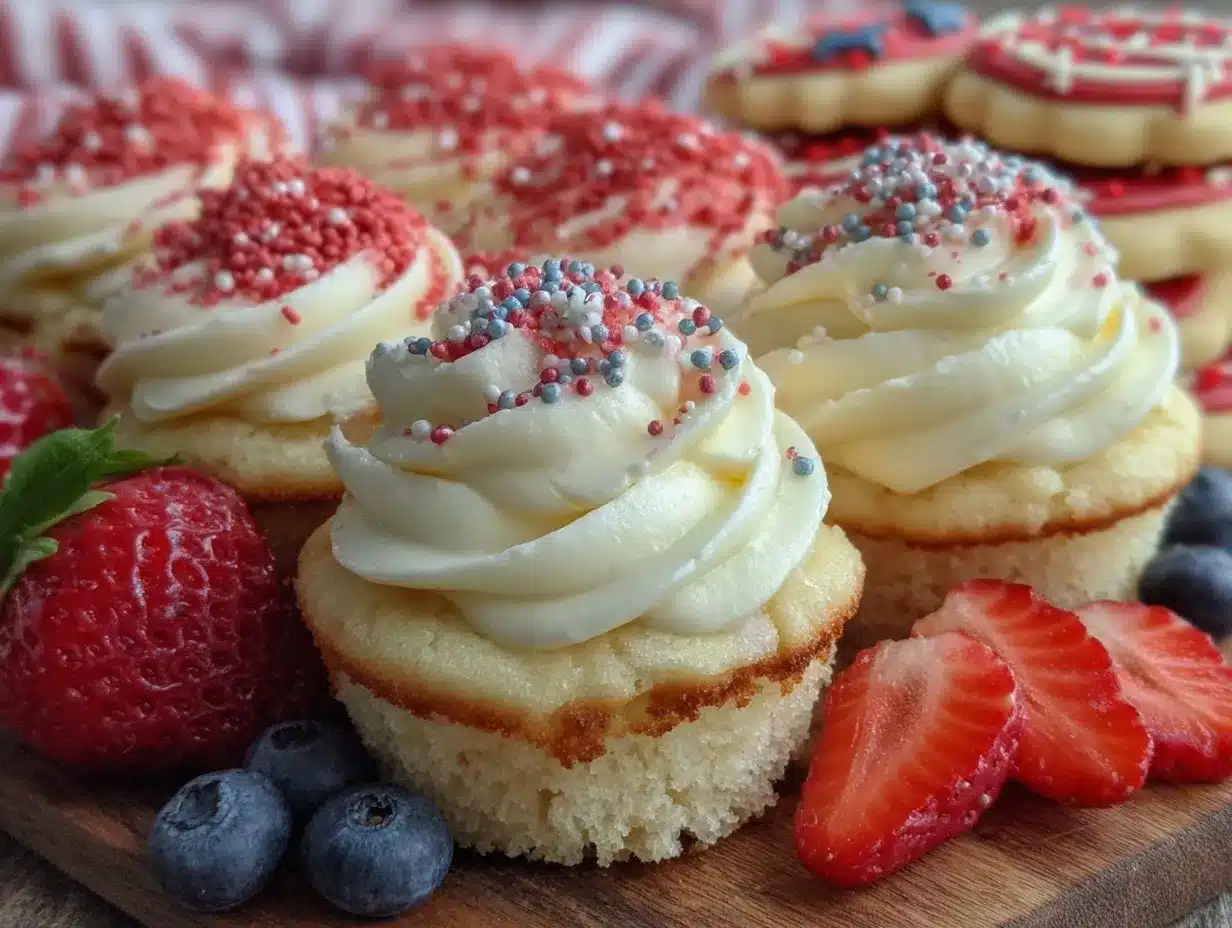
- Fresh strawberries, sliced (adds natural red color and freshness)
- Blueberries (for that classic blue hue)
- Whipped cream or coconut whipped cream (choose nut-free options)
- Red and blue sprinkles (check labels to confirm nut-free status)
- Powdered sugar (for dusting or simple frosting)
- For the Glaze or Filling:
- Strawberry or raspberry jam (look for natural, no-nut processing facilities)
- Lemon juice (adds brightness)
- Honey or maple syrup (natural sweeteners)
When picking ingredients, always double-check labels for nut warnings—even some seemingly safe products can be processed in facilities that handle nuts. I usually shop at stores like Trader Joe’s or Whole Foods because they label allergens clearly, but your local grocer might have great options too.
For substitutions, if you’re making gluten-free versions, a blend of oat flour and a gluten-free baking mix works well. If dairy is a concern, coconut oil or vegan butter alternatives can replace butter nicely, and coconut or soy milk takes the place of cow’s milk without sacrificing texture.
Equipment Needed
- Mixing bowls (various sizes to keep things organized)
- Electric hand mixer or stand mixer (makes creaming butter and sugar much easier, but whisk and elbow grease work too!)
- Measuring cups and spoons (precision matters here)
- Spatula (for folding in ingredients gently)
- Baking pans or muffin tins (depending on dessert choice—nonstick recommended)
- Cooling rack (to let the desserts rest without sogginess)
- Knife and cutting board (for slicing berries and decorating)
If you don’t have a stand mixer, no worries—a sturdy hand whisk and some patience do the trick. For budget-friendly options, silicone spatulas and glass mixing bowls are easy to find and maintain. Keeping blades and mixers clean between batches helps avoid cross-contamination, especially critical for nut-free treats.
Preparation Method
- Preheat your oven to 350°F (175°C). Grease your baking pans with butter or line with parchment paper to prevent sticking. This step sets the stage for a smooth baking process.
- Cream the butter and sugars in a large bowl using your mixer on medium speed, about 3-4 minutes, until the mixture is light and fluffy. You’ll know it’s ready when it looks pale and slightly puffed.
- Add eggs one at a time, beating well after each addition. This ensures even distribution and a smooth batter.
- Mix in vanilla extract for flavor. It’s amazing how this simple step brightens the whole dessert.
- In a separate bowl, whisk together flour, baking powder, and baking soda. Slowly add the dry ingredients to the wet mixture, alternating with milk, beginning and ending with the dry ingredients. Mix just until combined—avoid overmixing to keep your dessert tender.
- Pour the batter into prepared pans, smoothing the top with a spatula. If making cupcakes or mini cakes, fill the tins about two-thirds full to give room to rise.
- Bake for 20-25 minutes (cupcakes) or 35-40 minutes (cakes), or until a toothpick inserted in the center comes out clean. Oven temperatures vary, so keep an eye on your treats starting around 18 minutes.
- Let the desserts cool in the pan for 10 minutes, then transfer to a cooling rack. This prevents soggy bottoms and helps with decorating later.
- Prepare toppings or fillings while the dessert cools. Mix whipped cream with a bit of powdered sugar or whip coconut cream for a dairy-free option. Slice strawberries and gather blueberries.
- Decorate once cooled: Spread whipped cream or frosting, arrange berries in festive patterns, and sprinkle nut-free colored sprinkles for that classic July 4th flair.
Quick tip: If your batter feels too thick, add a tablespoon of milk at a time until it reaches a smooth, pourable consistency. Also, avoid opening the oven door too often—hot air escaping can cause your cakes to collapse. If you spot any cracks on top, don’t worry; that just adds character!
Cooking Tips & Techniques
One of the trickiest parts about nut-free baking, especially for celebrations, is maintaining that moist, tender texture without the usual nut flours or butters. One technique I’ve learned is to gently fold the dry ingredients into the wet ones instead of mixing aggressively. This keeps the batter light and airy.
Another tip: always use room temperature eggs and butter. Cold ingredients don’t blend as well and can leave you with uneven texture or lumps. I once rushed this step and ended up with a lumpy batter that took forever to bake evenly—lesson learned!
For decorating, less is more. Overloading with toppings can make the dessert soggy or messy, especially if it needs to sit out for a bit during school events. I like to add fresh berries just before serving to keep everything looking fresh and vibrant.
Timing-wise, multitasking helps a lot. While the desserts bake, prepare your toppings or clean up the kitchen to keep things running smoothly. And if you’re transporting these treats, pack decorations separately and assemble on-site if possible to avoid squished berries or melting cream.
Variations & Adaptations
- Seasonal Fruit Swap: In place of strawberries and blueberries, try raspberries and blackberries in late summer for a slightly different color palette and flavor profile.
- Gluten-Free Version: Use a 1:1 gluten-free baking flour blend (like King Arthur’s) and add an extra egg for structure. The texture comes out wonderfully moist and safe for gluten-sensitive guests.
- Dairy-Free Delight: Swap butter for vegan margarine and use coconut cream instead of whipped cream. This version is rich and creamy without any dairy, perfect for allergy-friendly menus.
- Fun Shapes: Instead of traditional round cakes or cupcakes, bake the batter in a sheet pan and cut into star shapes with cookie cutters. Kids love the festive shapes, and it’s a quick way to make multiple servings.
- Personal Favorite: I once tried adding a hint of lemon zest to the batter for a zesty twist that brightened up the sweetness—totally worth trying if you like a little citrus punch!
Serving & Storage Suggestions
These nut-free July 4th desserts are best served slightly chilled or at room temperature. If you’re transporting them to a school event, keep them in a sturdy container with compartments or cupcake liners to avoid smushing.
Pair these treats with a simple glass of cold milk, or for adults, a refreshing iced tea with lemon complements the berry flavors beautifully. For a casual backyard party vibe, these desserts work well alongside classic barbecue fare.
To store, wrap leftovers tightly in plastic wrap or place them in an airtight container. Refrigerate for up to 3 days—though I doubt they’ll last that long! For longer storage, freeze individual portions wrapped well and thaw overnight in the fridge. Reheat gently in a low oven if desired, but fresh is always best.
Fun fact: letting these desserts sit for a few hours in the fridge actually helps the flavors meld together—just don’t add fresh berries until serving to keep them looking their best.
Nutritional Information & Benefits
Each serving of these nut-free July 4th desserts offers a balanced treat without nuts, making them safe for allergy-sensitive eaters. They provide a good source of energy from natural sugars, with fresh berries adding vitamin C and antioxidants.
Using real butter and eggs contributes to protein and healthy fats, while substituting with dairy-free alternatives can accommodate those with lactose intolerance or vegan preferences. The recipes are naturally free from peanuts and tree nuts, with options to make gluten-free or dairy-free adaptations.
From a wellness perspective, these desserts let you indulge without the worry of allergic reactions, which can often overshadow the joy of celebration. It’s a small but meaningful way to include everyone, especially kids, in the fun and flavorful spirit of the holiday.
Conclusion
So, if you’re gearing up for a school celebration or any July 4th gathering where nut allergies are a concern, these nut-free desserts are your best bet for fun, flavor, and peace of mind. They’re easy to customize, safe for most dietary needs, and downright delicious.
I still think back to that hectic morning with Lisa and the mess of sprinkles on the counter—and honestly, that imperfect moment led to some of the best recipes I’ve ever made. I hope you’ll find the same joy in these treats and make them part of your own holiday traditions.
Give them a try, tweak them to your taste, and let me know which one becomes your family favorite. I’d love to hear your stories and any creative spins you come up with!
FAQs
Are these desserts completely nut-free?
Yes, all recipes are designed without nuts and use only nut-free ingredients. Always double-check labels to avoid cross-contamination.
Can I prepare these desserts ahead of time?
Absolutely! Most can be baked a day in advance and decorated just before serving to keep them fresh.
What if my child has other allergies like dairy or gluten?
There are easy substitutions included for dairy-free and gluten-free options to accommodate various dietary needs.
Can I use frozen berries instead of fresh?
Fresh berries are best for texture and presentation, but frozen can work if thawed and drained well, especially in fillings or glazes.
How do I keep the desserts safe during school events?
Use airtight containers and avoid exposure to heat or direct sunlight. Label your desserts clearly as nut-free to reassure teachers and other parents.
Pin This Recipe!

Nut-Free July 4th Desserts Easy & Delicious for School Celebrations

These nut-free July 4th desserts are easy, colorful, and perfect for school celebrations, ensuring every child can enjoy sweet summer flavors safely and deliciously.
- Prep Time: 15 minutes
- Cook Time: 25-40 minutes
- Total Time: 40-55 minutes
- Yield: 12 servings
- Category: Dessert
- Cuisine: American
Ingredients
- All-purpose flour (or substitute with oat or rice flour for gluten sensitivity)
- Baking powder
- Baking soda
- Granulated sugar
- Brown sugar
- Unsalted butter, softened
- Large eggs, room temperature
- Whole milk or dairy-free milk alternative (avoid almond milk; use oat or soy milk)
- Vanilla extract
- Fresh strawberries, sliced
- Blueberries
- Whipped cream or coconut whipped cream (nut-free options)
- Red and blue sprinkles (confirm nut-free status)
- Powdered sugar
- Strawberry or raspberry jam (natural, no-nut processing facilities)
- Lemon juice
- Honey or maple syrup
Instructions
- Preheat your oven to 350°F (175°C). Grease baking pans with butter or line with parchment paper.
- Cream the butter and sugars in a large bowl using a mixer on medium speed for 3-4 minutes until light and fluffy.
- Add eggs one at a time, beating well after each addition.
- Mix in vanilla extract.
- In a separate bowl, whisk together flour, baking powder, and baking soda.
- Slowly add the dry ingredients to the wet mixture, alternating with milk, beginning and ending with the dry ingredients. Mix just until combined.
- Pour the batter into prepared pans, smoothing the top with a spatula. Fill cupcake tins about two-thirds full if making cupcakes.
- Bake for 20-25 minutes for cupcakes or 35-40 minutes for cakes, or until a toothpick inserted in the center comes out clean.
- Let the desserts cool in the pan for 10 minutes, then transfer to a cooling rack.
- Prepare toppings or fillings while the dessert cools: mix whipped cream with powdered sugar or whip coconut cream, slice strawberries, and gather blueberries.
- Decorate once cooled by spreading whipped cream or frosting, arranging berries in festive patterns, and sprinkling nut-free colored sprinkles.
Notes
Use room temperature eggs and butter for best texture. Avoid overmixing batter to keep desserts tender. Add milk tablespoon by tablespoon if batter is too thick. Decorate with fresh berries just before serving to maintain freshness. Store leftovers in airtight containers refrigerated up to 3 days or freeze portions for longer storage.
Nutrition
- Serving Size: 1 cupcake or 1 slice
- Calories: 220
- Sugar: 20
- Sodium: 150
- Fat: 9
- Saturated Fat: 5
- Carbohydrates: 32
- Fiber: 1
- Protein: 3
Keywords: nut-free, July 4th, desserts, school celebrations, allergy-friendly, easy, festive, berry desserts