Love this? Save it for later!
Share the inspiration with your friends
My roommate was asleep by 9 PM, the dining hall had been closed for two hours, and I had exactly one packet of instant ramen left in my snack drawer. Not the good kind either—the cheap 25-cent kind that comes in a crinkly plastic wrapper and tastes like salty cardboard if you eat it straight. I was broke, hungry, and too tired to walk to the 7-Eleven down the street. So I stood there in my pajamas, staring at that sad little packet, and decided I wasn’t going to settle. Not tonight.
I started rummaging through the mini-fridge we shared. Half a cucumber rolling around in the crisper drawer. A squirt bottle of sriracha that was almost empty. Some sesame oil someone had brought back from a trip to the Asian market. A soft-boiled egg I’d made earlier that week and forgotten about. And then it hit me—I had everything I needed to turn this pathetic dorm-room dinner into something I’d actually look forward to eating. No stove required. No microwave mac and cheese vibes. Just a kettle, a bowl, and a little bit of creativity.
That night, I made what I now call my Quick No-Cook Dorm Ramen Upgrade Bowl, and honestly? It changed my whole approach to eating in college. This isn’t about making fancy food—it’s about making food you actually want to eat when you’re running on three hours of sleep and a prayer. It’s resourceful, it’s fast, and it tastes like you put in way more effort than you actually did. Which, let’s face it, is the real goal.
Why You’ll Love This Recipe
Look, I’ve tested a lot of ramen hacks over the years. Some were disasters (peanut butter does NOT belong in spicy ramen, trust me on this one). Others were decent but required too many steps or ingredients you’d never have on hand. This one is different. It’s the Goldilocks of ramen upgrades—just the right amount of effort for the payoff.
- No cooking required: I mean it. If you have an electric kettle or access to hot water, you’re golden. No stovetop, no microwave skills needed.
- 5 minutes flat: From craving to eating in the time it takes to boil water. Perfect for late-night study sessions or when you just can’t adult anymore.
- Pantry-friendly ingredients: Everything here is stuff you can keep in a dorm room or small apartment without a full kitchen setup.
- Actually filling: We’re adding protein and veggies so you’re not hungry again in an hour. This is a real meal, not a sad snack.
- Customizable to the max: Got different stuff on hand? Great. This recipe is more of a framework than a strict set of rules.
What makes this different from every other “fancy ramen” post you’ve seen? It’s designed for people with zero kitchen access. No sautéing. No boiling separate pots. No weird ingredients you’ll use once and forget about. I’ve made this version in actual dorm rooms, hotel bathrooms with a coffee maker, and even at my desk during a late shift. It works everywhere because it doesn’t ask for much.
And honestly? There’s something deeply satisfying about taking something so basic and making it feel intentional. That first bite—the one where the soft egg yolk mixes with the chili oil and coats every single noodle—that’s the moment you realize you don’t need a fancy kitchen to eat well. You just need a little bit of know-how and the willingness to dig through your roommate’s snack stash.
What Ingredients You Will Need
This recipe relies on simple, shelf-stable ingredients that you can keep in a dorm room, office drawer, or tiny apartment pantry. The beauty of it is that most of these are things you probably already have or can grab easily. Let me walk you through what you’ll need and why each one matters.
For the base:
- 1 packet instant ramen (any brand): Look, I’m not here to judge. Use the 25-cent kind or splurge on something like Shin Ramyun if you want. The key is that we’re adding enough stuff to it that the quality of the noodles matters more than the seasoning packet. I personally prefer a medium-thick noodle that holds up well to soaking.
- 1 soft-boiled or hard-boiled egg: This is your protein anchor. If you have access to a mini-fridge, you can boil a few eggs at the beginning of the week and keep them on hand. The jammy yolk is ideal, but a fully cooked egg works too. If you don’t have eggs, see the variations section.
- 1/2 cup fresh veggies: Cucumber, shredded carrots, green onions, or even baby spinach. Something crunchy and fresh to balance the soft noodles. I’m partial to cucumber because it doesn’t need washing or chopping if you buy the mini ones.
- 1 tablespoon soy sauce or tamari: This adds the salty, umami depth that makes the broth taste like it simmered for hours. It didn’t, but we don’t need to tell anyone that.
- 1 teaspoon sesame oil: A little goes a long way. This is the secret weapon that gives your bowl that “I know what I’m doing” flavor. Toasty, nutty, and absolutely essential.
- 1 teaspoon chili oil or sriracha: Optional if you don’t do spice, but honestly, the heat wakes everything up. I use the leftover sriracha from my fridge door that’s been there since orientation week.
- 1 teaspoon rice vinegar or lime juice: A tiny splash of acid brightens the whole bowl. Don’t skip this—it’s what keeps the broth from tasting flat.
- Optional toppings: Sesame seeds, furikake seasoning, crushed nori sheets, crispy fried onions, or leftover rotisserie chicken if you have it.
Ingredient selection tips: For the best texture, look for ramen with thicker, wavy noodles rather than the super thin ones. Brands like Nongshim or Mama are great options. If you can find individually packaged soft-boiled eggs at an Asian grocery store, grab them—they’re a game-changer for lazy cooking. And please, buy the smallest bottle of sesame oil you can find. A little goes a long way, and it lasts forever in the fridge.
Substitution guidance: No eggs? Use canned tuna, pre-cooked chicken strips from the store, or a spoonful of peanut butter for protein. No fresh veggies? Frozen peas or corn work fine—just let them thaw in the hot broth. No soy sauce? Use salt or a splash of fish sauce if you have it. The point is to work with what you’ve got.
Equipment Needed
Here’s the beautiful thing about this recipe—you barely need anything. If you’re living in a dorm or a tiny apartment, you probably already own most of this stuff.
- Electric kettle or access to hot water: This is your stove. Most dorms allow kettles, and they’re cheap to buy. If you don’t have one, use the hot water dispenser in your dorm lounge or even a coffee maker (run water through without coffee grounds).
- Large microwave-safe bowl or ramen bowl: You need something big enough to hold the noodles, toppings, and broth without spilling. I use a wide ceramic bowl I got at a thrift store for two dollars.
- Fork or chopsticks: For eating. Chopsticks are more fun, but a fork gets the job done.
- Spoon: For drinking the leftover broth at the end. Don’t pretend you don’t do this.
- Small plate or lid: To cover your bowl while the noodles steep. A paper towel works in a pinch.
Budget-friendly options: If you don’t have a kettle, you can microwave water in a mug for 2-3 minutes. Just be careful taking it out—it’s hot. I’ve also used the hot water from a Keurig (no pod, just water) in desperate times. It works. Not fancy, but it works.
Preparation Method
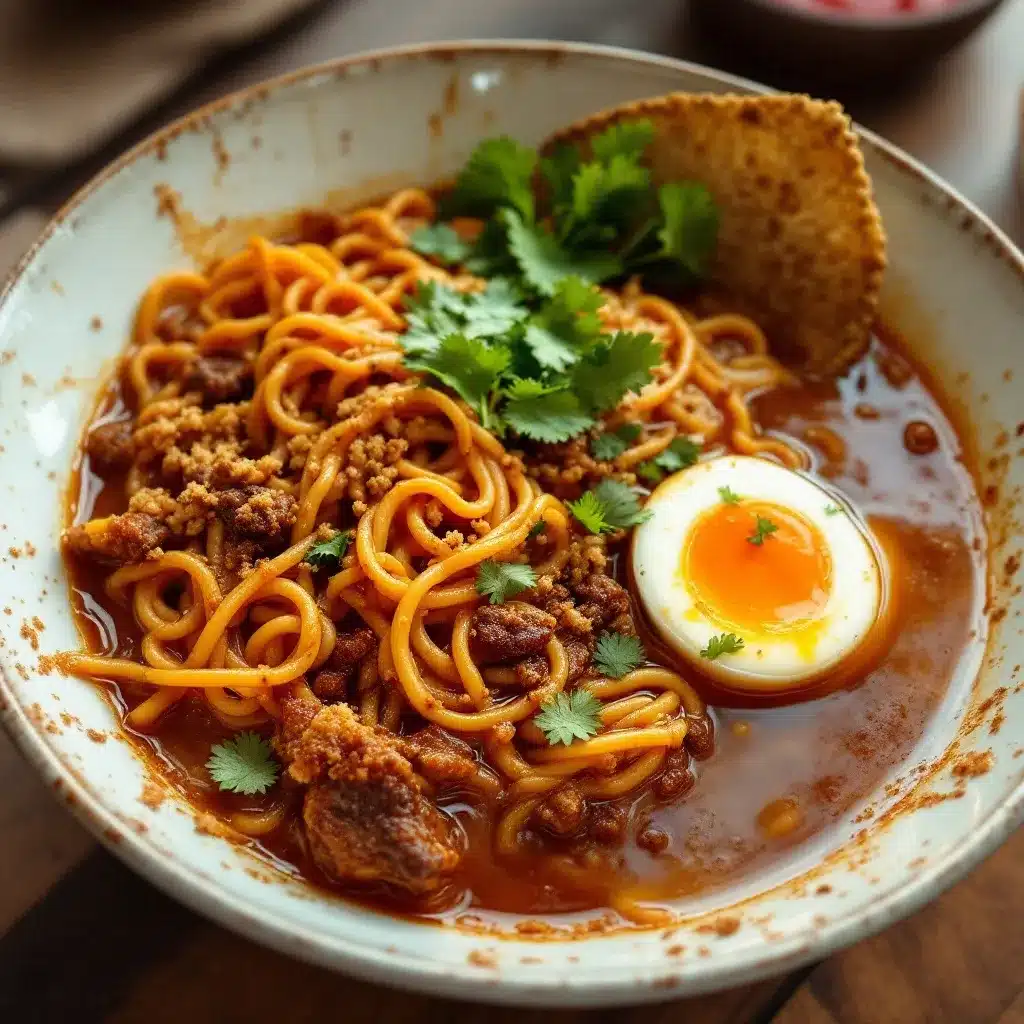
Alright, let’s get into it. This is the part where we turn that sad packet into something you’d actually post on Instagram. Follow these steps, and you’ll be eating in under five minutes.
- Boil your water: Fill your electric kettle with water and turn it on. If you’re using a microwave, heat 2 cups of water in a microwave-safe container for 2-3 minutes until it’s bubbling. You want it really hot, not just warm.
- Prep your toppings while the water heats: This is where you save time. Slice your cucumber into thin rounds or half-moons. Chop your green onions if you’re using them. Peel your soft-boiled egg and cut it in half lengthwise—watch that gorgeous yolk ooze out. If you’re using shredded carrots or other veggies, have them ready.
- Season the bowl: In your large bowl, add the soy sauce, sesame oil, chili oil (if using), and rice vinegar. Stir them together with a fork. This is your flavor base—it’s going to turn plain hot water into something that tastes like it came from a real restaurant.
- Add the noodles: Break the ramen block in half (or leave it whole if you prefer long noodles) and place it in the bowl on top of the seasoning mixture. Discard the seasoning packet or save it for another use—we don’t need it here.
- Pour in the hot water: Carefully pour the boiling water over the noodles until they’re fully submerged. You want enough water to cover the noodles plus about an inch extra for broth. Give everything a quick stir with your fork to dissolve the seasonings.
- Cover and steep: Place a plate or lid over your bowl and let it sit for 3 minutes. Set a timer—don’t guess. The noodles need this time to soften and absorb the flavors. Walk away. Check your phone. Do a little dance. Whatever.
- Add your toppings: After 3 minutes, remove the lid and stir the noodles again. They should be tender but not mushy. Now arrange your toppings on top—the egg halves, cucumber slices, green onions, and any other extras you’re using. This is where you make it look pretty if that’s your thing.
- Finish and eat: Sprinkle sesame seeds or furikake on top if you have them. Grab your chopsticks or fork, mix everything together so the egg yolk gets into the broth, and dig in immediately. The broth should be warm, savory, and just a little bit spicy.
Sensory cues: When you stir the noodles at step 6, they should be flexible and separate easily—no hard, crunchy bits remaining. The broth should look slightly cloudy from the seasonings, with little beads of sesame oil floating on top. When you cut into the egg, the yolk should be jammy and golden, not fully solid or liquid. The aroma should hit you with that toasty sesame and spicy chili combo.
Troubleshooting tip: If your noodles are still crunchy after 3 minutes, your water wasn’t hot enough. Add another 30 seconds and check again. If your broth tastes flat, add another splash of soy sauce or a pinch of salt. Trust your taste buds—they know what’s up.
Cooking Tips & Techniques
I’ve made this bowl probably fifty times by now, and I’ve learned a few things the hard way so you don’t have to. Here’s what I wish someone had told me on that first night in my dorm room.
Don’t overcook the noodles. Instant ramen is designed to cook fast. If you leave it in hot water for more than 4 minutes, you’ll end up with mushy, sad noodles that fall apart when you try to pick them up. Set that timer. Three minutes is the sweet spot for most brands.
Layer your flavors. The mistake most people make is just dumping everything into the bowl without thinking about order. Put your liquid seasonings in first, then the noodles, then the hot water. This way the flavors infuse into the noodles as they cook rather than just floating on top of the broth. It makes a real difference.
Warm your bowl first. If you’re feeling extra fancy, rinse your bowl with hot water before you start. This keeps the broth hot longer, especially if you’re eating in a cold dorm room. I learned this one after too many bowls that went lukewarm halfway through.
Save the seasoning packet for later. I know it’s tempting to just toss it in, but that packet is mostly salt and MSG. By using soy sauce and sesame oil instead, you get way more flavor complexity without the artificial aftertaste. Plus, you can use that seasoning packet to make a quick soup base for another meal—just mix it with hot water and some frozen veggies.
Multitasking is your friend. While the water boils, prep your toppings. While the noodles steep, clean up your workspace. This whole recipe takes less than 5 minutes, so you can easily make it during a study break or between classes without losing momentum.
Variations & Adaptations
This recipe is more of a template than a rigid set of rules. Here are some of my favorite ways to switch it up depending on what I have on hand or what I’m craving.
Spicy peanut butter ramen: Add 1 tablespoon of peanut butter to the seasoning mixture along with the soy sauce and chili oil. It creates a creamy, nutty broth that’s absolutely addictive. This is my go-to when I need comfort food after a rough day. Just stir well to dissolve the peanut butter completely.
Veggie-loaded version: Add a handful of baby spinach or kale along with the noodles before pouring in the hot water. The heat will wilt the greens perfectly. Top with shredded carrots, cucumber, and a sprinkle of sesame seeds. This version feels almost virtuous.
Protein boost: No egg? No problem. Add pre-cooked chicken strips, canned tuna (drained), or even leftover ground beef from a previous meal. I’ve also used crumbled firm tofu in a pinch—just press it dry and add it with the toppings. For a vegetarian option, try a high-protein Greek yogurt chicken salad on the side for extra staying power.
Kimchi ramen: Add a big spoonful of kimchi (with its juices) to the bowl before pouring in the hot water. The fermented flavor adds a whole new dimension. Top with a soft-boiled egg and sliced green onions. This version is my favorite when I’m fighting off a cold.
Cold ramen salad: In summer, skip the hot water altogether. Cook the noodles according to package directions, drain them, and rinse with cold water. Toss with soy sauce, sesame oil, rice vinegar, and your toppings. Serve cold like a noodle salad. It’s refreshing and ridiculously easy.
Serving & Storage Suggestions
This recipe is best eaten immediately—like, within minutes of finishing it. The noodles will continue to absorb liquid and get softer as they sit, so don’t try to save it for later. That said, here’s how to make the most of it.
Serving temperature: Hot. Like, blow-on-it-before-you-eat-it hot. The broth should be steaming when you sit down. If it’s lukewarm, you waited too long or your water wasn’t hot enough. Serve it in a deep bowl with a spoon on the side for the broth.
Presentation tips: Arrange your toppings in neat little piles rather than just dumping them in. The egg goes in the center, cucumber slices on one side, green onions scattered over the top. A sprinkle of sesame seeds or furikake makes it look like you actually tried. Take a photo before you mix it all up—you’ll thank me later.
What to serve with it: This bowl is a complete meal on its own, but if you’re feeding a crowd or want something extra, try pairing it with a savory cottage cheese bowl for a protein-packed side. Or keep it simple with some no-bake peanut butter energy balls for dessert.
Storage: Honestly, don’t store this. It doesn’t keep well. The noodles get mushy, the veggies get soggy, and the broth gets absorbed. If you absolutely must save it, store the noodles and broth separately and reheat the broth before combining. But really, just eat it fresh. It takes five minutes to make.
How flavors develop: The broth actually gets more flavorful as it sits because the seasonings continue to infuse. But the texture of the noodles suffers. So the trade-off is real. My advice? Make it, eat it, enjoy it. Then make another one tomorrow.
Nutritional Information & Benefits
Let’s be real—instant ramen isn’t health food. But with these upgrades, you’re turning a nutritionally empty meal into something that actually has some redeeming qualities.
Estimated nutritional values per serving: Approximately 350-400 calories, 15g protein, 12g fat, 48g carbohydrates, and 4g fiber. These numbers vary based on your specific ingredients and toppings. The egg adds about 70 calories and 6g of protein, while the veggies add minimal calories but significant vitamins.
Health benefits of key ingredients: The egg provides high-quality protein and choline, which supports brain function—perfect for studying. Cucumber adds hydration and vitamin K. Sesame oil contains healthy fats and antioxidants. The chili oil (if you use it) contains capsaicin, which can boost metabolism and reduce inflammation.
Dietary considerations: This recipe can be made gluten-free by using rice noodles or gluten-free ramen, and tamari instead of soy sauce. It’s naturally dairy-free and nut-free (unless you add peanut butter). For a lower-carb option, use shirataki noodles or zucchini noodles instead of ramen.
Allergens: Contains wheat (ramen noodles), soy (soy sauce), and eggs. Sesame oil is a common allergen too. Adjust as needed for your dietary restrictions.
Personal perspective: I’m not going to pretend this is a superfood bowl. But compared to eating plain ramen or ordering greasy takeout, this is a massive upgrade. It’s about making better choices within your constraints, not achieving perfection. And honestly, the satisfaction of making something yourself—even something this simple—is good for your mental health too.
Conclusion
This Quick No-Cook Dorm Ramen Upgrade Bowl is proof that you don’t need a full kitchen, a big budget, or a lot of time to eat something that actually tastes good. It’s resourceful cooking at its finest—taking something basic and turning it into a meal you look forward to. Whether you’re a college student surviving on dining hall hours, a young professional in a tiny apartment, or just someone who wants a fast dinner without the hassle, this recipe is for you.
I love this recipe because it reminds me that good food isn’t about fancy equipment or expensive ingredients. It’s about knowing how to work with what you have. Every time I make it, I think back to that night in my dorm room—tired, hungry, and convinced I was stuck with a sad bowl of noodles. And then I made this, and everything changed.
So here’s my challenge to you: Make this bowl tonight. Use whatever you have on hand. Don’t stress about getting it perfect. And then drop a comment below telling me how it turned out. What toppings did you use? Did you discover a new combination? I want to hear about it. Share this with a friend who’s living on instant noodles and needs an upgrade. Let’s make dorm food better, one bowl at a time.
Happy eating, friends. You’ve got this.
Frequently Asked Questions
Can I make this without an electric kettle?
Absolutely. If you have access to a microwave, heat 2 cups of water in a microwave-safe mug or bowl for 2-3 minutes until it’s boiling. You can also use the hot water dispenser in a dorm lounge or coffee shop. Just make sure the water is really hot—not warm—or your noodles won’t cook properly.
What if I don’t have soy sauce or sesame oil?
No problem. Use salt as a substitute for soy sauce, or skip it entirely and use the seasoning packet from the ramen. For sesame oil, any neutral oil will work—you’ll lose some flavor, but it’ll still be good. A splash of olive oil or even butter can add richness in a pinch.
How do I make a soft-boiled egg without a stove?
If you have a microwave, you can make a soft-boiled egg by placing an egg in a microwave-safe bowl, covering it with water, and microwaving for 1 minute. Let it sit for 30 seconds, then check. The timing varies by microwave wattage, so experiment. Otherwise, boil a batch of eggs at the beginning of the week and keep them in the fridge for quick ramen upgrades.
Can I use this recipe with cup noodles instead of packet ramen?
Yes, but you’ll need to adjust slightly. Dump the noodles into a bowl (discard the cup), add your seasonings and toppings, and pour hot water over them. The cooking time is the same—3 minutes covered. Just be aware that cup noodles are usually thinner and may cook faster, so check at 2 minutes.
Is this recipe budget-friendly?
Extremely. A packet of ramen costs about 25 cents, an egg is around 20 cents, and the other ingredients are pantry staples that last for multiple uses. You can make this bowl for under $1.50 total, which is way cheaper than takeout or dining hall food. Plus, you’re using ingredients you probably already have, so there’s no extra trip to the store.
Pin This Recipe!

Quick No-Cook Dorm Ramen Bowl (Easy 5-Minute Upgrade)

Transform a basic packet of instant ramen into a delicious, filling meal in just 5 minutes with no stove required. This resourceful recipe uses pantry-friendly ingredients and simple techniques for a satisfying upgrade.
- Prep Time: 2 minutes
- Cook Time: 3 minutes
- Total Time: 5 minutes
- Yield: 1 serving 1x
- Category: Main Course
- Cuisine: Asian Fusion
Ingredients
- 1 packet instant ramen (any brand)
- 1 soft-boiled or hard-boiled egg
- 1/2 cup fresh veggies (cucumber, shredded carrots, green onions, or baby spinach)
- 1 tablespoon soy sauce or tamari
- 1 teaspoon sesame oil
- 1 teaspoon chili oil or sriracha (optional)
- 1 teaspoon rice vinegar or lime juice
- Optional toppings: sesame seeds, furikake seasoning, crushed nori sheets, crispy fried onions, or leftover rotisserie chicken
Instructions
- Boil your water: Fill your electric kettle with water and turn it on. If using a microwave, heat 2 cups of water in a microwave-safe container for 2-3 minutes until bubbling.
- Prep your toppings while the water heats: Slice cucumber into thin rounds or half-moons. Chop green onions if using. Peel soft-boiled egg and cut in half lengthwise.
- Season the bowl: In a large bowl, add soy sauce, sesame oil, chili oil (if using), and rice vinegar. Stir together with a fork.
- Add the noodles: Break the ramen block in half and place in the bowl on top of the seasoning mixture. Discard the seasoning packet or save for another use.
- Pour in the hot water: Carefully pour boiling water over the noodles until fully submerged, plus about an inch extra for broth. Stir to dissolve seasonings.
- Cover and steep: Place a plate or lid over the bowl and let sit for 3 minutes. Set a timer.
- Add your toppings: After 3 minutes, remove lid and stir noodles. Arrange toppings on top—egg halves, cucumber slices, green onions, and any other extras.
- Finish and eat: Sprinkle sesame seeds or furikake on top if desired. Mix everything together and eat immediately.
Notes
Don’t overcook the noodles—3 minutes is the sweet spot. Layer flavors by putting liquid seasonings in first, then noodles, then hot water. Warm your bowl first with hot water to keep broth hot longer. Save the seasoning packet for another use. This recipe is best eaten immediately; noodles will continue to absorb liquid and get softer as they sit.
Nutrition
- Serving Size: 1 bowl
- Calories: 375
- Sugar: 3
- Sodium: 1200
- Fat: 12
- Saturated Fat: 2.5
- Carbohydrates: 48
- Fiber: 4
- Protein: 15
Keywords: dorm ramen, quick ramen upgrade, no-cook ramen, easy ramen recipe, 5-minute meal, college food, instant ramen hack


